Refrigerator Ice Maker Water Line
Importance of the Ice Maker Water Line
Getting the most out of your fridge's ice maker is key for anyone keen on having a nonstop supply of ice. Whether you're gearing up for family shindigs, cooking up a storm, or throwing epic parties, having a handle on how your ice maker does its thing can seriously up your kitchen game.
Understanding the Functionality
The ice maker water line is the superstar here, channeling water from your home’s plumbing straight into the fridge's ice maker. This little setup means you'll never have to faff about with manual ice trays again. Once your ice maker is all set to go, it fills up with water, freezes those little cubes, and pops them into the freezer bin for you to grab whenever.
| Part | What It Does |
|---|---|
| Water Pipe | Keeps the water coming for your ice maker. |
| Cube Maker | Churns out ice cubes with no fuss from you. |
| Easy Living | Bye-bye to the hassle of making ice the old way. |
Significance of a Reliable Water Line
A strong water line is like the backbone of your ice production. If it conks out or springs a leak, you're looking at not enough ice, water puddles, or even a banged-up fridge. Make sure this line is tipped and topped!
With a trusty water line, you'll have ice on tap for anything from chilling drinks to sprucing up snacks for your guests. Keeping an eye on things with regular checks can catch sneaky problems before they blow up. For more on keeping things shipshape, check out our maintenance tips.
Getting cozy with your ice maker’s water line can keep everything running like a dream. It’s all about some peace of mind and making the kitchen even more of a joy to be in.
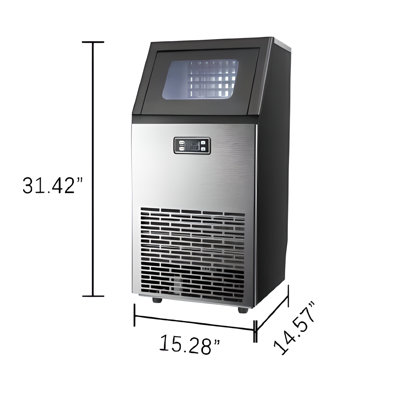
Assessing Your Setup
Before you hook up that spiffy fridge ice maker, there are a coupla' things you gotta check on. It's all about making sure everything fits and will work like a charm, right where you've got your appliances parked.
Compatibility Check
Alright, rule numero uno: Make sure your fridge can actually hook up to a water line for the ice maker. Most of the new-fangled ones, they come with that feature, but you don’t wanna assume. Best to go by the book—your fridge manual should have the skinny. Look out for these:
| Feature | What You Need |
|---|---|
| Water Source | Tap into a nearby cold water supply |
| Refrigerator Type | Needs to handle an ice maker |
| Connection Size | Usually a 1/4-inch water line is your guy |
Peek at that user manual to double-check. No ice maker in there? Might be time to think about an upgrade, yeah? If you're scratching your head about where to buy one, we've got a spiffy guide on good places to buy a fridge.
Positioning Considerations
Where you park that fridge is just as important, alright? It's all about smooth sailin', with enough room for that water line to do its job. Keep these in mind:
| Factor | Good Move |
|---|---|
| Distance to Water Line | Keep it 5-10 feet from the source, tops. |
| Breathing Room | Leave a few inches behind and next to the fridge. Let it breathe and cool properly! |
| Flat Ground | Make sure it’s on a stable, flat spot. Wonky fridges make for wonky ice makers. |
Sort these out, and you're golden. With the fridge sitting pretty, your water line installation should be a breeze. Lined up correctly, it'll dodge any future headaches. Want more details on what you'd need? Swing by our piece about energy-saving fridges for 2024.
Installation Process
Setting up a fridge's ice maker water line involves several easy steps to make sure it's done right. Get the right stuff together, and then just follow this guide for a smooth installation.
Tools You'll Need
Before jumping in, make sure you gather all the tools needed. Here's what you'll need:
| Tool | Why You Need It |
|---|---|
| Adjustable Wrench | Tightens those loose ends |
| Screwdriver | Secures all the little pieces |
| Drill | For making holes, if needed |
| Utility Knife | Cuts your water line to fit |
| Measuring Tape | Helps you get the right lengths |
| Teflon Tape | Stops leaks in their tracks |
Step-by-Step Installation Guide
-
Get Your Space Ready: Clear up around the fridge and where the water comes in. Turn off the water—no one likes a wet surprise.
-
Measure Up: Grab your measuring tape and get the length from the water source to the fridge's hookup.
-
Cut That Line: With your knife, cut the water line to the length you need. Keep it straight for a snug fit.
-
Put in the Water Valve: If you’re tapping into an existing line, pop in a shutoff valve. Make sure it’s snug and secure.
-
Hook Up the Line: Connect one end of the line to the shutoff and the other to the fridge. A little Teflon tape might come in handy here to keep it all leak-free.
-
Keep It Secure: Make sure there are no twists or turns. Use clips or brackets if you need them to hold everything steady.
-
Water Time: Turn the water supply on slow-like and keep an eye out for drips. If you see any, turn the water off and fix it up.
-
Ice Time: Once everything’s hooked up right and leak-free, turn the fridge back on and check that ice maker. It might take a bit before it starts cranking out ice.
Want more tips on keeping your fridge running smoothly or finding the right one for you? Check out topics like energy-efficient refrigerators for 2024 or best compact refrigerator for Christmas.
Troubleshooting Common Ice Maker Problems
When your fridge's ice maker goes on the fritz, it can be a real pain. Here's a look at the usual suspects behind ice maker issues and how you can tackle them.
Low Ice Production
Noticed your ice maker isn't churning out as much ice? Here’s what's possibly going wrong and how to fix it:
| Possible Culprit | What You Can Do |
|---|---|
| Water line is clogged | Check and clean the water line. A little vinegar mixed with water can help clear things out. |
| Settings are off | Double-check that the freezer's at 0°F to 5°F. Tweak it if needed. |
| Forgot to turn it on | Give the ice maker controls a once-over to see if it's accidentally been switched off. |
Need more tips on keeping your ice supply flowing? Check out our piece on safely freezing lemon meringue pie.
Leaks or Drips
Got water where it shouldn’t be? That's often a sign of trouble in the ice maker's water path. Here's how to handle these drips and leaks:
| Likely Trouble | How to Handle It |
|---|---|
| Loose bits and bobs | Hunt down and tighten those loose connections. |
| Tubing gone bad | Look for any damage on the tube. Swap it out if you spot any issues. |
| Clogged drain pan | Dump the water from a full drain pan to stop any spills. |
Keep your refrigerator in top shape by reading our cleaning guide.
No Water Flow
If the water’s not running to your ice maker, it needs fixing pronto. Here's the drill:
| Problem | Fix-It Tips |
|---|---|
| Shut-off valve’s off | Make sure that shut-off valve is open wide. |
| Frozen pipes | Thaw the water line gently with a hairdryer or some warm towels. No sharp tools, please! |
| Power outages | Ensure the fridge is powered on. Look out for any blown fuses or breakers that jumped ship. |
Get the scoop on handling your fridge’s water line by reading our article on compact refrigerators that shine for Christmas.
Staying one step ahead of these typical glitches can keep your ice maker running smoothly. Always keep safety top-notch when messing around with your appliances.
Maintenance Tips
Keeping your refrigerator’s ice maker water line in shape keeps things cool—not just your drinks, but your stress levels too. Give a little love to that water line with regular cleaning and checkups to protect your ice from weird flavors and funky leaks.
Regular Cleaning
It's a no-brainer: a clean water line leads to better-tasting ice. Here’s how to keep it sparkling:
- Pull the Plug: Kill the water supply. Disconnect the water line from both the fridge and the main source.
- Mix It Up: Create a cleaning brew with warm water and a splash of vinegar, or grab a food-safe cleaner if you’ve got one on hand.
- Zap the Gunk: Push your cleaning concoction through the line to bust any lurking grime. Then rinse out with clean water.
- Shine That Ice-maker: Hunt down any residual ice or residue in the ice maker and bin. You might need a new bin if the old one’s looking shabby.
| Cleaning Schedule | Frequency |
|---|---|
| Water Line Cleaning | Every 3 to 6 months |
| Ice Maker Maintenance | Every 6 to 12 months |
Inspections and Checks
Spot trouble before it ruins your day. Here are the suspects worth a glance:
- Water Line Checkups: Keep an eye out for any wonky bends or pinch marks. A beaten-up line means leaks.
- Connection Confidence: Make sure all connections are tight and secure. Slack ones might lead to a puddle party in your kitchen.
- Filter Freshness: If there’s a filter, see that it’s clean and swap it following the maker’s guidelines.
Table of inspection hints:
| Inspection Focus | Frequency |
|---|---|
| Water Line Condition | Monthly |
| Connection Tightness | Monthly |
| Filter Status | Every 6 months |
Replacing Components
Nothing lasts forever, and some parts prefer to peace out sooner. Be on the lookout for troublemakers:
- Water Filters: Keep the ice rolling by swapping filters regularly. Grimy filters can mess things up.
- Hoses and Fittings: If you spy cracks or leaks, it’s time to say “bye-bye” and swap them out.
-
Ice Maker Mechanism: Troubles with the ice? Maybe it's time to play detective and change out any tricky pieces inside. to keep your kitchen kingdom tidy. Keep that ice maker water line happy, and your icy adventures will stay unfazed by drama.
Safety Measures
Keeping things secure while setting up or maintaining your fridge's ice maker water line is top of mind. Here's the rundown on staying on the safe side with electricity, handling the water line like a pro, and when it’s time to call in the cavalry.
Electrical Precautions
Before you even peek at that ice maker water line, get your safety hat on for electrical do's and don’ts. Here's the lowdown:
Precaution What to Do Unplug It Yank that plug out! Make sure the fridge ain't got no juice before you start tinkering. Right Tools, Right Job Grab those insulated tools. They keep you from getting a nasty zap. Spot the Frayed Ends Give cords and outlets the once-over. If they're looking sketchy, swap 'em out pronto! Paying attention to these keeps you out of harm's way when messing with your fridge's electrics.
Water Line Safety
Nailing water line work stops leaks and keeps your H20 tasting fresh. Here's your cheat sheet:
Safety Tip What to Do Go Food-Grade Only use water lines that say "food-safe" to keep your water clean. Check-Ups Are a Must Scout for cracks or sneaky leaks now and then. If something looks off, time to fix or replace! Lock It Down Every connection's got to be tight. Grab a wrench to give it a nice fit if ya need to. Being on top of these steps wards off leaks and keeps your kitchen dry and your water crisp.
Professional Assistance
If you hit a snag or something feels beyond your league, dialing up the pros is smart. Here's when to tag in the experts:
Scenario What You Should Do Tricky Installs Not sure where that piece goes? Getting a professional ensures it all fits together like LEGO. Leak That Won't Quit A plumber or appliance whiz can sleuth out those stubborn drips. Electric Woes If sparks fly or you're spooked by any electric stuff, call a certified electrician. Letting the experts handle the tough bits saves headaches and might just keep your kitchen saga-free.