How To Revive Sourdough Starter From The Fridge
Understanding Sourdough Starter
What is Sourdough Starter?
Sourdough starter is a fermented mixture of flour and water that contains wild yeast and lactic acid bacteria. This combination helps to leaven bread and give it its distinctive tangy flavor. Unlike commercial yeast, which is isolated and highly controlled, sourdough starter is a living culture that can be nurtured and maintained indefinitely.
The starter acts as the foundation for sourdough bread, providing the natural leavening and flavor. By feeding the starter regularly with fresh flour and water, you can keep it active and healthy. For a deeper dive into maintaining your starter, you can explore our guide on feeding sourdough starter from the fridge.
Importance of Reviving Your Sourdough Starter
When your sourdough starter has been stored in the fridge, it enters a dormant state. Reviving the starter is crucial to wake up the yeast and bacteria, making it ready for baking again. A healthy, active starter is essential for achieving the best results in your sourdough bread.
Reviving your starter ensures that it regains its leavening power and flavor profile. Neglecting this process can result in weak or inconsistent bread. To avoid such issues, follow the necessary steps to reactivate your starter effectively. Learn more about the process in our article on how to reactivate sourdough starter from the fridge.
By understanding the basics of sourdough starter and the importance of reviving it, you set the foundation for successful sourdough baking. Keep your starter healthy and active to enjoy delicious, homemade sourdough bread. For more tips and detailed instructions, check out our section on feeding sourdough starter in the fridge.
Retrieving Your Sourdough Starter from the Fridge
Reviving your sourdough starter from the fridge is a straightforward process, but it requires careful attention to detail. Ensuring your starter is active and healthy is essential for successful baking.
Preparation Steps
- Gather Supplies: You'll need a clean jar, flour, water, and a stirring utensil.
- Remove Starter from Fridge: Take your sourdough starter out of the refrigerator and let it sit at room temperature for about an hour.
- Inspect the Starter: Look for any signs of mold or an off smell. If everything looks and smells normal, proceed with the revival process.
- Discard a Portion: Remove about half of the starter to make room for fresh flour and water. This portion can be discarded or used in other recipes.
- Feed the Starter: Add equal parts flour and water to the remaining starter. Stir until well combined. Typically, a ratio of 1:1:1 (starter:flour:water) by weight is recommended.
- Cover the Jar: Use a breathable cover like a cloth or paper towel secured with a rubber band to allow the starter to breathe.
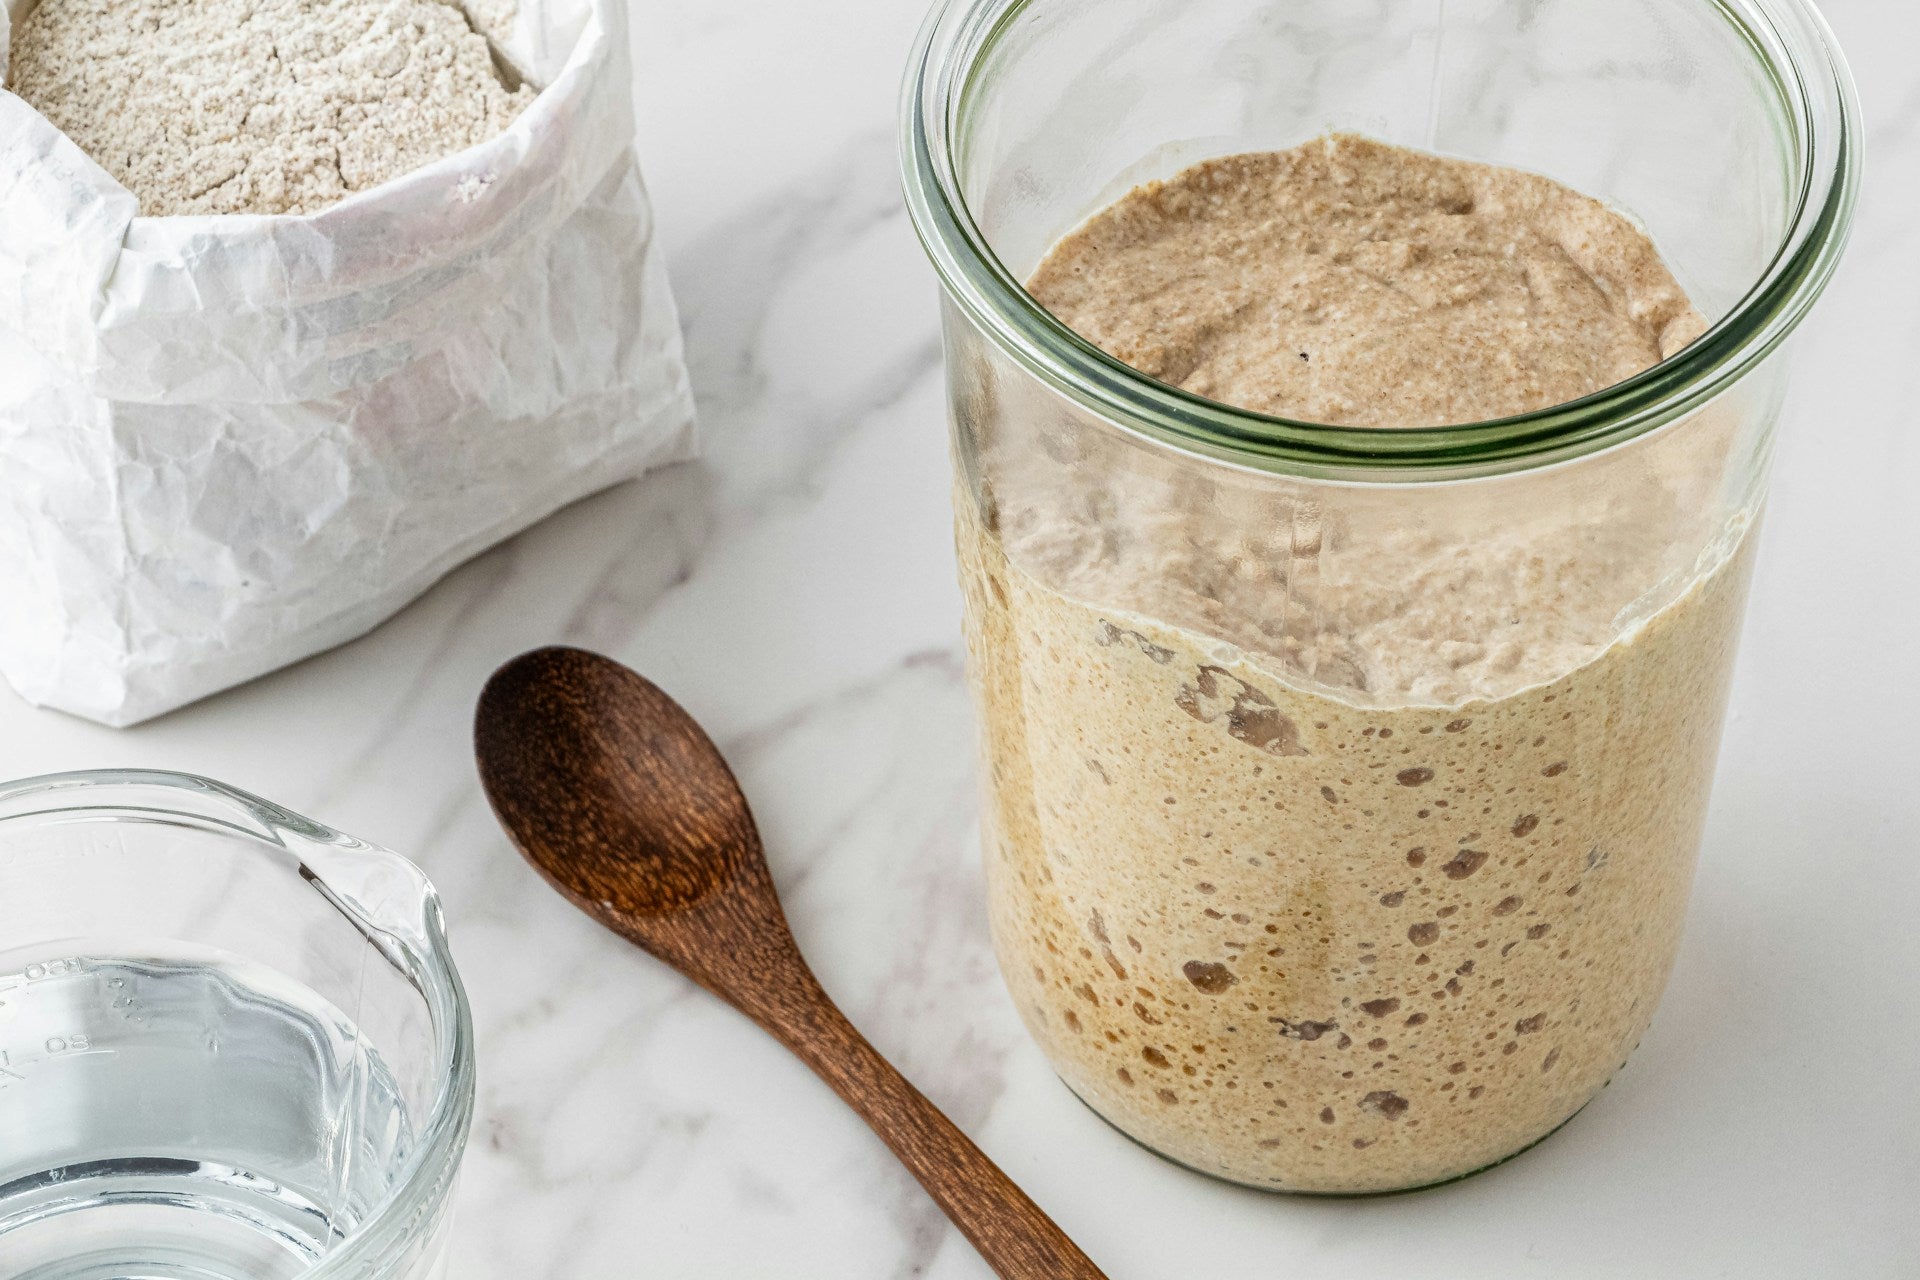
Signs of a Dormant Starter
A dormant starter may not show immediate signs of activity. Here are some indicators to look for:
| Signs | Description |
|---|---|
| No Bubbles | Lack of bubbles indicates the starter is not yet active. |
| Thick Consistency | A thick, paste-like consistency suggests the starter needs feeding. |
| Mild Smell | A healthy dormant starter will have a slightly tangy smell, not overly sour or foul. |
| Grayish Liquid | A layer of hooch, or grayish liquid, on top is normal. It indicates the starter is hungry and needs feeding. Stir it back in or pour it off before feeding. |
Once you've completed the preparation steps and identified the signs of a dormant starter, you can move on to the step-by-step revival process. This involves discarding and feeding your starter, while keeping an eye on temperature and timing. For more detailed guidance on feeding, visit our article on feeding sourdough starter from the fridge.
Step-by-Step Revival Process
Reviving a sourdough starter from the fridge can seem daunting, but with the right steps, you can bring it back to life. This section will guide you through the process of discarding and feeding your starter, as well as important considerations regarding temperature and timing.
Discarding and Feeding Your Starter
To revive your sourdough starter, you need to follow a systematic approach to discarding and feeding it. Here are the steps:
- Remove the Starter: Take the sourdough starter out of the fridge and let it sit at room temperature for about an hour.
- Discard: Remove half of the starter. This helps in maintaining the right balance and prevents overgrowth of unwanted bacteria.
- Feeding: Add equal parts of flour and water to the remaining starter. For example, if you have 100 grams of starter, add 100 grams of flour and 100 grams of water.
| Step | Action | Quantity |
|---|---|---|
| Remove | Take out of the fridge | 1 hour at room temperature |
| Discard | Remove half | 50% of starter |
| Feed | Add flour and water | 1:1:1 ratio of starter, flour, and water |
For more detailed instructions on feeding, you can refer to our guide on feeding sourdough starter from the fridge.
Temperature and Timing Considerations
Temperature and timing play crucial roles in the revival process of your sourdough starter. Here are some things to keep in mind:
- Room Temperature: Ideally, keep your starter in a warm place, between 70°F to 75°F. Cooler temperatures will slow down the fermentation process.
- Feeding Schedule: Initially, you may need to feed the starter every 12 hours until it becomes active and bubbly. Once stabilized, you can switch to a less frequent feeding schedule.
| Temperature | Effect on Starter |
|---|---|
| 70°F - 75°F | Optimal for fermentation |
| Below 70°F | Slower fermentation |
| Above 75°F | Risk of over-fermentation |
- Observing Activity: Look for signs of activity like bubbling and a pleasant, tangy smell. If the starter does not show these signs after a couple of feedings, continue the process until it becomes active.
For comprehensive tips on managing temperature and timing, check out our article on activating sourdough starter from the fridge.
By following these steps, you can successfully revive your sourdough starter and get it ready for baking. For more information on using your revived starter, visit our page on baking sourdough after proofing in the fridge.
Monitoring the Starter
After retrieving and beginning to revive your sourdough starter from the fridge, it's essential to monitor its progress. Understanding the visual and olfactory signs of a healthy starter can help ensure successful reactivation.
Visual Cues to Look For
When monitoring your sourdough starter, pay attention to several key visual indicators. These signs can provide insight into the health and activity of your starter.
- Bubbles and Activity: A healthy starter should show signs of fermentation, such as bubbles on the surface and throughout the mixture. These bubbles indicate that the natural yeast and bacteria are active.
- Rise and Fall: Observe the starter's volume. It should rise after feeding and then fall after reaching its peak. This cycle demonstrates that the yeast is fermenting the flour and producing gas.
- Consistency: The texture should be thick and sticky, not overly watery or dry. Adjust the flour and water ratio if necessary to maintain the correct consistency.
- Color: The starter should have a creamy off-white color. Any unusual colors, such as pink or orange, could indicate contamination.
Here is a table summarizing the visual cues:
| Visual Cue | Description |
|---|---|
| Bubbles | Indicates active fermentation |
| Rise and Fall | Shows yeast activity and gas production |
| Consistency | Thick and sticky texture |
| Color | Creamy off-white |
For more detailed steps on activating sourdough starter from the fridge, refer to our comprehensive guide.
Smell Test for Starter Health
The smell of your sourdough starter is another critical indicator of its health. A well-maintained starter has a distinct, pleasant scent that can provide valuable information about its condition.
- Pleasantly Sour: A healthy starter typically has a tangy, sour aroma due to the lactic acid produced by the bacteria.
- Yeasty: There should be a mild yeasty smell, similar to bread dough or beer, indicating active yeast.
- Avoid Off-Putting Odors: Any foul, rotten, or overly sharp smells could suggest spoilage or contamination. If you detect these odors, it may be necessary to discard the starter and begin anew.
Here's a summary table for the smell test:
| Smell Indicator | Description |
|---|---|
| Pleasantly Sour | Tangy aroma from lactic acid |
| Yeasty | Mild bread dough or beer smell |
| Avoid Off-Putting Odors | Foul or rotten smells indicate spoilage |
Regularly checking these visual and olfactory cues ensures that your starter stays healthy and active. For more tips on feeding sourdough starter from the fridge, explore our detailed resources.
By closely monitoring your sourdough starter, you can confidently revive and maintain it, leading to successful baking experiences. If you encounter any unusual signs, refer to our troubleshooting section or explore articles like how to restart sourdough starter from the fridge for further guidance.
Maintaining Your Revived Starter
Proper maintenance of your revived sourdough starter is essential to ensure its longevity and activity. Here are some key aspects to consider:
Regular Feeding Schedule
Feeding your sourdough starter on a regular basis is crucial for keeping it active and healthy. This involves discarding a portion of the starter and replenishing it with fresh flour and water. The frequency of feeding can vary depending on how often you bake and whether you store your starter at room temperature or in the fridge.
- Room Temperature: If kept at room temperature, feed your starter at least once a day.
- Refrigerated: When stored in the fridge, feeding once a week is usually sufficient.
| Storage Condition | Feeding Frequency |
|---|---|
| Room Temperature | Daily |
| Refrigerated | Weekly |
For more detailed guidelines on feeding sourdough starter, you can refer to our article on feeding sourdough starter from the fridge.
Storage Tips for Long-Term Maintenance
Proper storage of your sourdough starter is equally important for its longevity. Here are some tips to help you maintain your starter over the long term:
- Use an Airtight Container: Store your starter in a clean, airtight container to prevent contamination and drying out.
- Label and Date: Always label your container with the date of the last feeding to keep track of its maintenance schedule.
- Refrigeration: If you don't plan to use your starter frequently, store it in the fridge to slow down its activity. This reduces the frequency of required feedings.
- Avoid Metal Containers: Use glass or plastic containers, as metal can react with the acidic environment of the starter.
For more information on maintaining your sourdough starter, check out our article on maintaining sourdough starter in the fridge.
By adhering to a regular feeding schedule and following proper storage practices, you can ensure that your revived sourdough starter remains active and ready for baking whenever you need it.
Troubleshooting Common Issues
Reviving your sourdough starter from the fridge can sometimes present a few challenges. Knowing how to address these common issues will help ensure your starter remains healthy and active.
Dealing with Moldy Starter
Mold on your sourdough starter is a serious concern. Mold typically appears as fuzzy spots in a variety of colors, including white, green, black, or pink. If you notice mold on your starter, it's best to discard it and start anew, as mold can produce harmful toxins.
To avoid mold growth, ensure your starter is stored in a clean container with a tight-fitting lid. Regular feeding and proper storage will also help prevent mold issues. For more information on maintaining your sourdough starter, visit our article on maintaining sourdough starter in the fridge.
Addressing Unusual Smells or Colors
A sourdough starter should have a pleasant, slightly tangy aroma. If your starter smells off, such as smelling like acetone, rotten eggs, or any other foul odor, it may be an indication of an imbalance in the microbial community.
Common Smell Issues and Solutions:
| Unusual Smell | Possible Cause | Solution |
|---|---|---|
| Acetone/Nail Polish Remover | Over-fermentation or starvation | Feed the starter more frequently |
| Rotten Eggs | Bad bacteria presence | Discard and start fresh |
| Vinegar | High acidity | Adjust feeding schedule and ratios |
If your starter develops an unusual color, such as pink, orange, or red streaks, it could be a sign of contamination. In such cases, it is safer to discard the starter and start with a new one.
Maintaining a consistent feeding routine and using clean utensils and containers can help prevent these issues. For additional tips on feeding your starter, check out our guide on feeding sourdough starter from the fridge.
By addressing these common issues promptly, you can ensure your sourdough starter remains healthy and ready for baking. For more detailed troubleshooting and guidance, visit our comprehensive article on troubleshooting sourdough starter.
Using Your Revived Sourdough Starter
Testing Starter Readiness
To ensure your revived sourdough starter is ready for baking, a few simple tests can be performed. One of the most reliable methods is the float test. Take a small spoonful of starter and drop it into a glass of water. If it floats, your starter is active and ready to use. If it sinks, give it more time and feed it again.
Another indicator of readiness is the starter's doubling time. After feeding, mark the level of the starter in the container and observe it over the next few hours. A healthy starter should double in size within 4 to 6 hours at room temperature.
| Test | Indicator | Result |
|---|---|---|
| Float Test | Starter floats in water | Ready |
| Doubling Time | Doubles in size within 4-6 hours | Ready |
For more information on maintaining a healthy starter, visit our article on feeding sourdough starter from the fridge.
Incorporating Your Starter into Recipes
Once your sourdough starter is active, you can start incorporating it into a variety of recipes. The following steps will help you use your starter effectively:
- Measure the Starter: Most recipes will specify the amount of starter needed. Measure it accurately to ensure the best results.
- Mix with Ingredients: Combine the starter with the other ingredients as instructed in the recipe. This usually includes flour, water, and salt.
- Bulk Fermentation: Allow the dough to undergo bulk fermentation. This process can take several hours and is crucial for developing the dough's flavor and texture. For more on this, read our article on sourdough bulk rise in the fridge.
- Shaping and Proofing: Shape the dough and let it proof. You can proof sourdough in the fridge overnight for convenience. Learn more about this in our article on do you have to proof sourdough in the fridge?.
- Baking: Preheat your oven and bake the dough as directed. The result should be a delicious, crusty sourdough loaf.
For those looking to explore different recipes, consider trying sourdough pancakes, waffles, or even pizza dough. Using your revived starter can open up a world of culinary possibilities. For additional recipe ideas and techniques, check out our article on how to make sourdough bread from starter in the fridge.
By following these steps and regularly feeding your starter, you can enjoy the benefits of homemade sourdough bread and other baked goods. If you encounter any issues, refer to our troubleshooting section or read more about how to reactivate sourdough starter from the fridge.
Get Your Upgrade or New Addition at Fridge.com
Whether you're searching for your perfect fridge, freezer, wine fridge, beer fridge, ice maker, or kegerator, we have what you need.
Shop the world's best brands at Fridge.com.
We also have tons of awesome articles about kitchen stuff and home news. Enhance your home, garage, backyard, patio, and office with the coolest essentials. With every necessary type of residential refrigerator or freezer in our collection, we've got you covered.
Elevate your game and shop now at Fridge.com!