Understanding Sourdough Proofing
What is Sourdough Proofing?
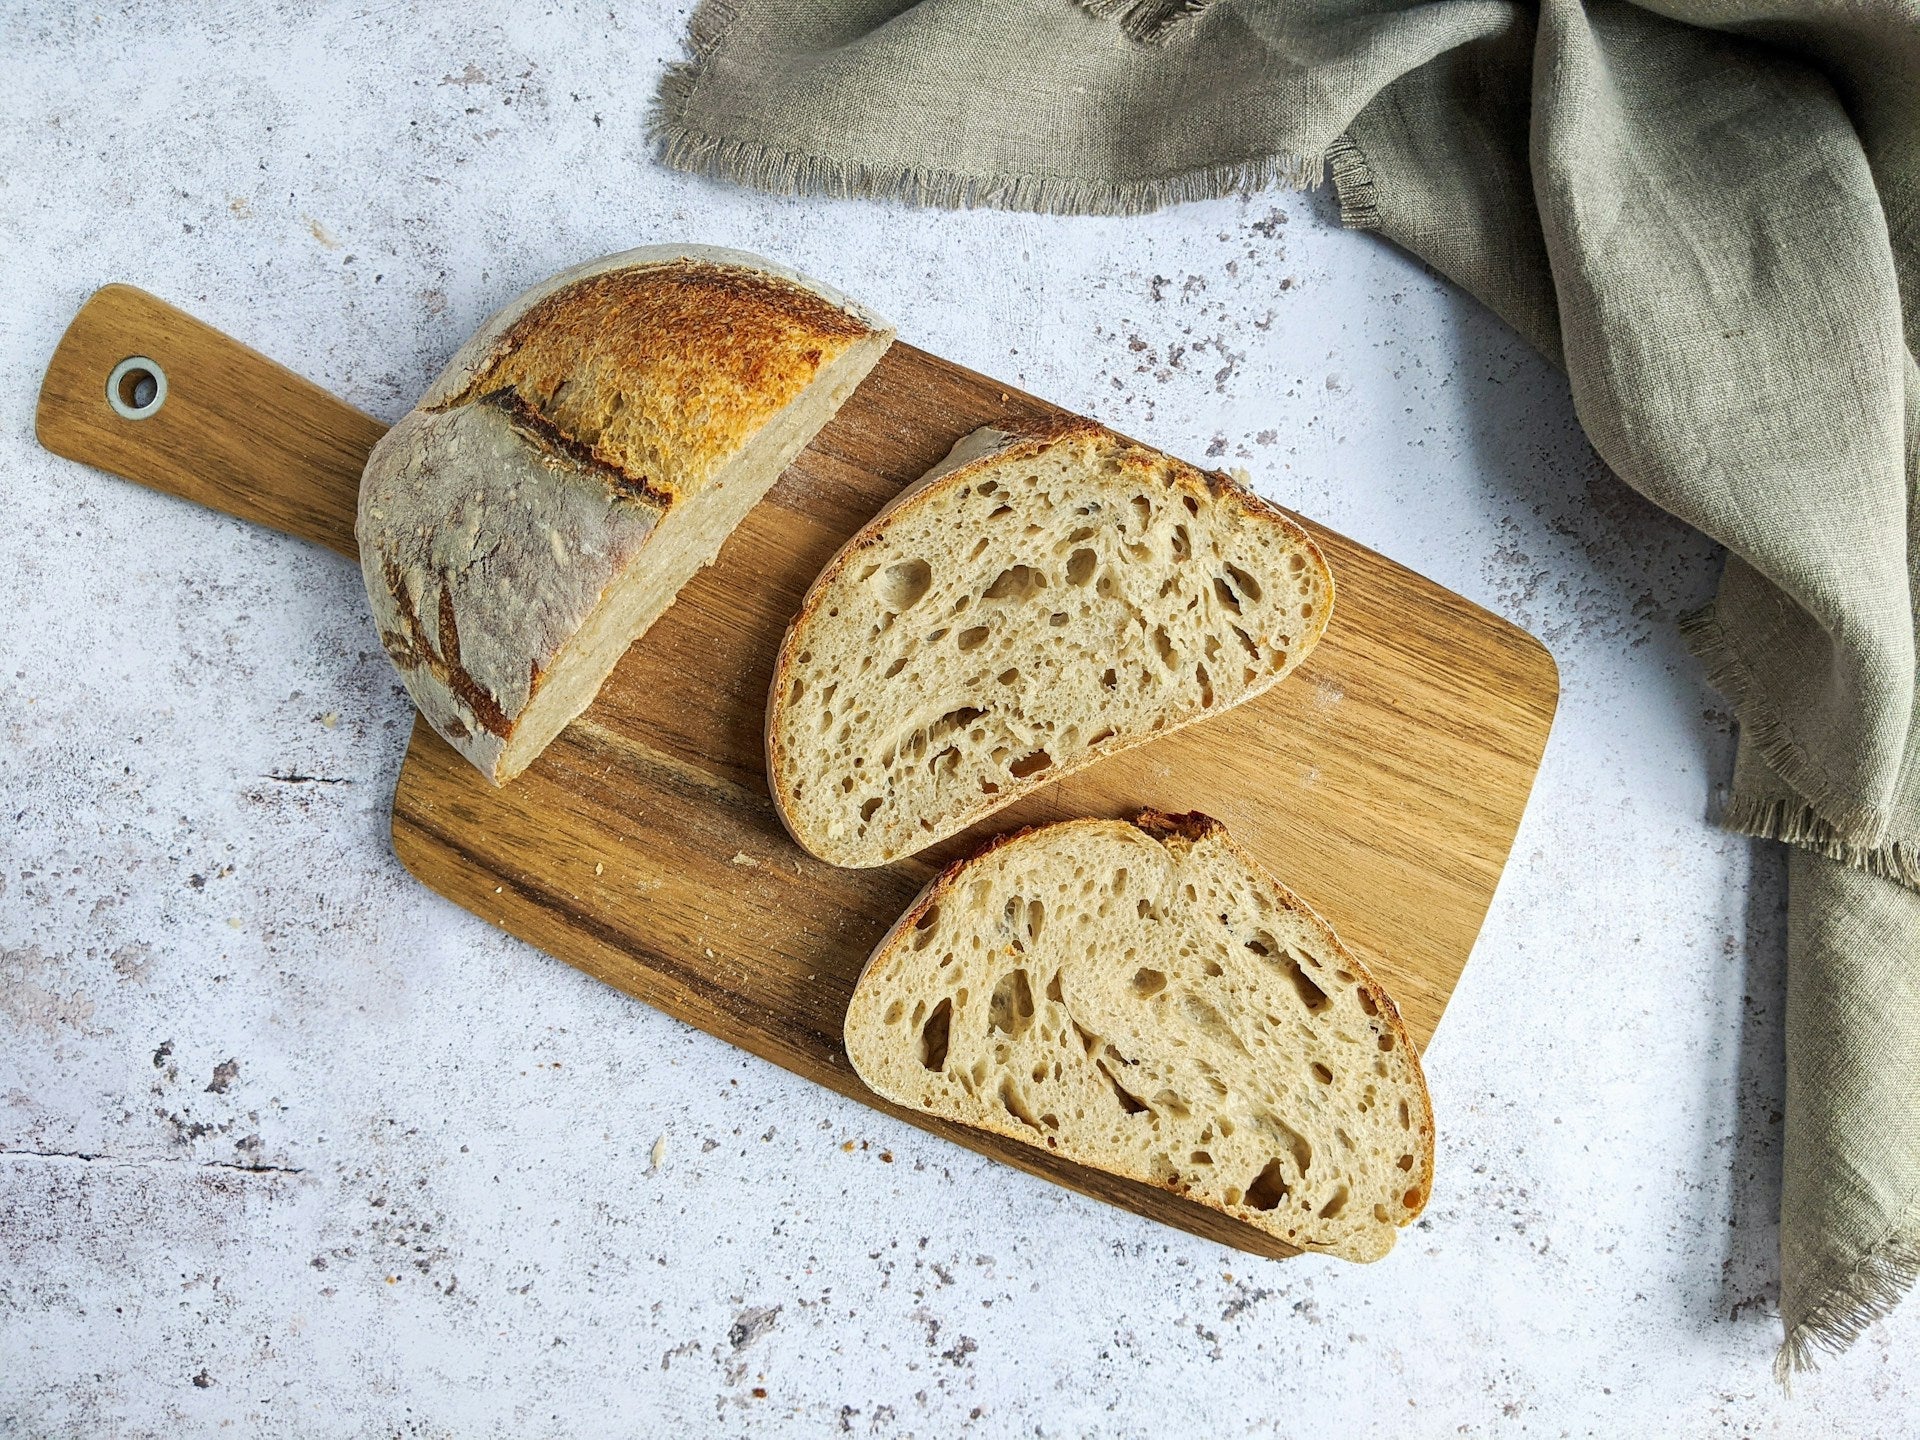
Sourdough proofing is the process where your dough undergoes its final rise before baking. This crucial step allows the dough to develop its flavor and texture. During proofing, the naturally occurring yeast in the sourdough starter ferments, producing carbon dioxide gas that gets trapped in the dough, causing it to rise.
| Key Aspect | Description |
|---|---|
| Process | Final rise before baking |
| Purpose | Develop flavor and texture |
| Action | Yeast fermentation and gas production |
Importance of the Proofing Process
The proofing process is vital for several reasons. It ensures that your sourdough bread achieves the right texture and crumb structure. Proper proofing allows the dough to become airy and light, which is essential for a well-baked loaf. Additionally, proofing enhances the flavor profile of your bread by allowing the natural fermentation process to develop complex flavors.
| Benefit | Description |
|---|---|
| Texture | Achieves airy and light structure |
| Flavor | Develops complex flavors |
| Crumb Structure | Ensures ideal internal texture |
For more information on how to proof your sourdough effectively, check out our guide on sourdough bread in the fridge.
By understanding what sourdough proofing is and recognizing its importance, you can better decide whether to proof your dough at room temperature or in the fridge. For detailed steps and conditions for each method, refer to baking sourdough after proofing in the fridge.
Room Temperature Proofing
Room temperature proofing is a common method for allowing your sourdough to rise. This process can yield excellent results if done correctly.
Steps for Room Temperature Proofing
- Mix and Knead the Dough: Combine your sourdough starter, flour, water, and salt. Knead until the dough is smooth and elastic.
- First Rise (Bulk Fermentation): Place the dough in a large, lightly oiled bowl. Cover it with a damp cloth or plastic wrap.
- Let it Rise: Allow the dough to rise at room temperature until it has doubled in size. This can take anywhere from 4 to 6 hours, depending on the ambient temperature and the activity level of your starter.
- Shape the Dough: Once the dough has risen, gently deflate it and shape it into a loaf or desired form.
- Second Rise (Proofing): Place the shaped dough in a proofing basket or on a baking sheet. Cover it again and let it rise until it has doubled in size. This usually takes about 2 to 4 hours.
Ideal Conditions for Room Temperature Proofing
For successful room temperature proofing, it's important to create an environment that encourages optimal fermentation. Here are the ideal conditions:
- Temperature: The ideal room temperature for proofing sourdough is between 70°F to 75°F (21°C to 24°C). Higher temperatures will speed up the process, while lower temperatures will slow it down.
- Humidity: Maintain a moderate humidity level to prevent the dough from drying out. You can cover the dough with a damp cloth or plastic wrap to keep it moist.
- Draft-Free Area: Place the dough in a draft-free area to ensure consistent temperature and humidity levels.
| Factor | Ideal Condition |
|---|---|
| Temperature | 70°F to 75°F (21°C to 24°C) |
| Humidity | Moderate, covered with a damp cloth or plastic wrap |
| Location | Draft-free area |
For more information on the benefits of proofing sourdough in the fridge, you can refer to our article on baking sourdough after proofing in the fridge. Additionally, if you are interested in alternative proofing methods, check out our guide on how long can you leave sourdough dough in the fridge.
Refrigerator Proofing
Benefits of Proofing Sourdough in the Fridge
Proofing sourdough in the refrigerator, also known as cold fermentation, offers several advantages. One of the primary benefits is the enhanced flavor development. The cold environment slows down the fermentation process, allowing the dough to develop a deeper, more complex taste. This method is particularly beneficial for those who appreciate a tangy, robust flavor in their sourdough bread.
Another advantage is the convenience it offers. Proofing in the fridge provides flexibility in timing. You can prepare the dough in advance and leave it to ferment overnight or even for a few days. This is especially useful for individuals with busy schedules.
Moreover, cold fermentation can improve the texture and structure of the bread. The extended fermentation time allows the gluten to develop more fully, resulting in a bread with a better rise and a more open crumb. For more insights on how this process impacts the final product, visit our article on baking sourdough after proofing in the fridge.
How to Proof Sourdough in the Fridge
To proof sourdough in the refrigerator, follow these steps:
-
Prepare the Dough: Mix and knead your sourdough as you normally would. Shape it into a ball or loaf, depending on your preference.
-
First Rise: Allow the dough to undergo its initial rise at room temperature until it has doubled in size. This can take anywhere from 3 to 6 hours.
-
Shaping: After the first rise, gently deflate the dough and shape it into its final form. Place the shaped dough into a proofing basket or a bowl lined with a cloth.
-
Cover and Chill: Cover the dough with plastic wrap or a damp cloth to prevent it from drying out. Place it in the refrigerator for the desired duration. The proofing time can range from 12 to 48 hours, depending on your schedule and flavor preference.
| Proofing Time | Temperature | Flavor Development |
|---|---|---|
| 12 hours | 40°F (4°C) | Mild |
| 24 hours | 40°F (4°C) | Moderate |
| 48 hours | 40°F (4°C) | Strong |
-
Final Rise: Before baking, remove the dough from the fridge and let it come to room temperature for about 1 to 2 hours. This allows the yeast to become active again and the dough to complete its final rise.
-
Bake: Preheat your oven and bake the dough as per your recipe instructions. For tips on transitioning from fridge to oven, check our guide on baking sourdough after proofing in the fridge.
By understanding the benefits and steps involved in refrigerator proofing, you can enhance both the flavor and texture of your sourdough bread. For more tips on managing your sourdough starter and dough, explore our various articles on sourdough maintenance and feeding techniques.
Factors to Consider
When deciding whether to proof sourdough in the fridge, several factors come into play. Understanding these can help you make an informed choice based on your specific needs and preferences.
Dough Consistency
The consistency of your dough is crucial for successful proofing. Sourdough that is too sticky or too dry can affect the final texture and rise of your bread. When proofing in the fridge, the dough tends to become firmer due to the cold temperature, making it easier to handle. However, if your dough is too stiff, it may not rise adequately in the fridge.
| Consistency | Room Temperature | Fridge |
|---|---|---|
| Sticky | Difficult to manage | Easier to handle |
| Dry | May not rise well | May become too firm |
For more tips on handling dough consistency, check out our article on feeding sourdough starter from the fridge.
Time Considerations
Time is another significant factor when choosing your proofing method. Room temperature proofing generally takes less time compared to fridge proofing. If you have a busy schedule, fridge proofing offers the flexibility to slow down the fermentation process, allowing you to bake at a more convenient time.
| Proofing Method | Time Required |
|---|---|
| Room Temperature | 4 - 6 hours |
| Fridge | 12 - 24 hours |
For more information on timing, see our article on how long can you leave sourdough dough in the fridge.
Flavor Development
Flavor is a key aspect of sourdough bread, and the proofing method you choose can significantly impact the taste. Proofing sourdough in the fridge allows for a slower fermentation process, enhancing the flavor complexity. The prolonged fermentation helps develop deeper, more nuanced flavors in the bread.
| Proofing Method | Flavor Profile |
|---|---|
| Room Temperature | Mild |
| Fridge | Complex and tangy |
For more insights on flavor development, read our article on how long does sourdough starter last in the fridge?.
Understanding these factors can help you decide whether to proof your sourdough at room temperature or in the fridge. For additional guidance on sourdough proofing, you can explore our articles on baking sourdough after proofing in the fridge and can I put my sourdough in the fridge overnight?.
Comparing Room Temperature and Fridge Proofing
When deciding the best method for proofing your sourdough, understanding how each environment affects the bread's texture and flavor can guide your choice.
Texture and Crumb Structure
Proofing your sourdough at room temperature and in the fridge impacts the bread's texture and crumb structure differently.
| Proofing Method | Texture | Crumb Structure |
|---|---|---|
| Room Temperature | Softer crust | Larger, irregular holes |
| Fridge | Chewier crust | Smaller, uniform holes |
Room temperature proofing often results in a softer crust and a more open crumb structure with larger, irregular holes. This method is preferred if you enjoy a lighter, airier bread.
On the other hand, fridge proofing usually develops a chewier crust and a denser crumb with smaller, more uniform holes. This method is ideal for those who prefer a tighter crumb and a more substantial bite to their bread. For more details on preparing your dough for fridge proofing, check out how to proof sourdough in the fridge.
Flavor Profile
The environment in which you proof your sourdough also plays a significant role in defining the flavor profile of your bread.
| Proofing Method | Flavor Notes |
|---|---|
| Room Temperature | Mild, slightly tangy |
| Fridge | Complex, tangy, slightly sour |
Room temperature proofing tends to produce a milder flavor with just a hint of tanginess. This method is perfect for those who prefer a more subtle sourdough taste.
Conversely, proofing in the fridge enhances the bread's flavor complexity, resulting in a tangier and slightly sour taste. The extended fermentation time in the cooler environment allows the natural yeast and bacteria to develop deeper and richer flavors. If you are interested in other cold fermentation techniques, explore sourdough bulk rise in the fridge.
Choosing between room temperature and fridge proofing depends on your texture and flavor preferences. Experimenting with both methods can help you find what works best for your schedule and taste.
Troubleshooting
Common Issues with Proofing
When proofing sourdough, you might encounter several common issues. Understanding these can help you achieve better results with your baking.
| Issue | Description | Solution |
|---|---|---|
| Overproofing | Dough rises too much and collapses | Reduce proofing time or temperature |
| Underproofing | Dough doesn't rise enough | Extend proofing duration or increase warmth |
| Dense Crumb | Tight and heavy interior | Ensure proper kneading and adequate hydration |
| Excessive Sourness | Too tangy flavor | Shorten proofing time or lower temperature |
| Flat Loaf | Spread out dough without height | Adjust hydration and handle dough gently |
For more information on how to handle specific dough issues, you can visit our section on baking sourdough after proofing in the fridge.
Tips for Successful Proofing
To ensure successful proofing, follow these tips:
- Monitor Temperature: Keep the dough at a steady, appropriate temperature for optimal yeast activity.
- Use a Proofing Basket: This helps maintain the shape and structure of the dough.
- Hydration Level: Adjust the water content in your dough for a softer, more pliable texture.
- Timing: Be aware of the proofing duration based on your specific environment and dough characteristics.
- Cover the Dough: Prevent the dough from drying out by covering it with a damp cloth or plastic wrap.
For those who prefer a slower fermentation process, proofing in the fridge can enhance flavor and texture. Learn more about the benefits by visiting can I put my sourdough in the fridge overnight?.
By addressing these common issues and following the tips provided, you can improve your sourdough proofing process and achieve better results. For additional guidelines and troubleshooting, refer to our detailed articles on feeding sourdough starter from the fridge and how to store sourdough in the fridge.
Experimenting with Proofing Methods
Trying Different Proofing Techniques
Experimenting with various proofing methods can help you find the best approach for your sourdough. Whether you choose to proof at room temperature or in the fridge, each method offers unique benefits. You might want to try a combination of both to see which one works best for your specific needs.
Room Temperature Proofing
Proofing your dough at room temperature allows it to rise more quickly. This method is ideal if you have a shorter timeframe for baking. For detailed steps, refer to our section on steps for room temperature proofing.
Refrigerator Proofing
Using the fridge for proofing slows down the fermentation process, allowing for better flavor development. This method is perfect for those who prefer a more complex taste. Learn more about the benefits of proofing sourdough in the fridge.
Finding What Works Best for Your Schedule and Preferences
Your lifestyle and schedule will greatly influence which proofing method suits you best. Here are some factors to consider:
| Factor | Room Temperature Proofing | Refrigerator Proofing |
|---|---|---|
| Time Required | 4-6 Hours | 12-24 Hours |
| Flavor Development | Mild | Complex |
| Convenience | Quick | Flexible |
Time Management
If you have a busy schedule, refrigerator proofing might be more convenient. You can prepare the dough in advance and bake it at a time that suits you. For more information on how long you can keep your dough in the fridge, visit how long can you keep sourdough starter in the fridge?.
Flavor Preferences
Your taste preferences will also play a role in deciding which method to use. If you enjoy a more complex flavor, refrigerator proofing is the way to go. For a milder taste, room temperature proofing is preferable.
Experiment and Adjust
Feel free to experiment with different techniques and find what works best for you. You can try a hybrid approach by starting the proofing process at room temperature and then transferring the dough to the fridge. For more tips and tricks, check out tips for successful proofing.
By trying different proofing techniques and adjusting them according to your schedule and preferences, you'll discover the best method to achieve delicious sourdough bread consistently.
Get Your Upgrade or New Addition at Fridge.com
Whether you're searching for your perfect fridge, freezer, wine fridge, beer fridge, ice maker, or kegerator, we have what you need.
Shop the world's best brands at Fridge.com.
We also have tons of awesome articles about kitchen stuff and home news. Enhance your home, garage, backyard, patio, and office with the coolest essentials. With every necessary type of residential refrigerator or freezer in our collection, we've got you covered.
Elevate your game and shop now at Fridge.com!