How To Restart Sourdough Starter From The Fridge
Sourdough Starter Maintenance
Proper maintenance of your sourdough starter is essential to ensure it remains active and healthy. In this section, we'll explore the importance of maintaining your sourdough starter and when it might be necessary to restart it.
Importance of Properly Maintaining Your Sourdough Starter
Maintaining your sourdough starter is crucial for several reasons. A well-maintained starter ensures consistent fermentation, which is key to baking delicious sourdough bread. Here are some benefits of proper maintenance:
- Consistency: Regularly feeding your starter keeps it active and ensures consistent results in your baking.
- Flavor: Proper maintenance helps develop the unique tangy flavor that sourdough is known for.
- Health: An active starter is less prone to developing mold or harmful bacteria.
To keep your starter in top shape, you should feed it regularly, even when stored in the fridge. For more detailed guidance on feeding, check out our article on feeding sourdough starter from the fridge.
When to Restart Your Sourdough Starter
There are times when you may need to restart your sourdough starter. This can happen if the starter becomes inactive or if it has been neglected for an extended period. Here are some signs that indicate it's time to restart your starter:
- Lack of Bubbling: If your starter no longer bubbles and rises after feeding, it may be inactive.
- Unpleasant Odor: A foul smell, different from the usual tangy aroma, can indicate that the starter has gone bad.
- Mold Growth: Visible mold on the surface is a clear sign that the starter needs to be restarted.
Restarting your sourdough starter involves removing it from the fridge, discarding a portion, and feeding it with fresh flour and water. You can find a step-by-step guide in our article on how to restart sourdough starter from the fridge.
By understanding the importance of proper maintenance and knowing when to restart your sourdough starter, you can ensure that your starter remains healthy and active, ready to produce delicious sourdough bread. For additional tips and information, explore our other articles on activating sourdough starter from the fridge and storing sourdough starter in the fridge.
Preparing to Restart
Restarting your sourdough starter from the fridge is a straightforward process, but it requires some preparation. Here’s what you need to know.
Materials You'll Need
Before you begin, gather all the necessary materials. Having everything ready will make the process smoother.
List of Materials:
- Sourdough starter: The dormant starter from your fridge.
- Flour: All-purpose or bread flour works best.
- Water: Preferably filtered or bottled to avoid chlorine.
- Mixing bowl: A clean bowl for mixing.
- Measuring cups/spoons: For accurate measurements.
- Clean jar: For storing your refreshed starter.
- Spatula or spoon: For stirring.
Steps to Take Before Restarting
1. Assess Your Starter
Start by checking the condition of your sourdough starter. Look for any discoloration or off smells. A healthy starter should have a tangy aroma. If you notice any mold, discard the starter and start fresh.
2. Gather Your Materials
Ensure you have all materials listed above. Clean and dry your mixing bowl, measuring tools, and storage jar to avoid contamination.
3. Measure Out Your Ingredients
For restarting your sourdough starter, you’ll need equal parts of flour and water.
| Ingredient | Measurement |
|---|---|
| Flour | 1/2 cup (60g) |
| Water | 1/2 cup (120ml) |
4. Let Your Starter Warm Up
Remove your starter from the fridge and let it sit at room temperature for about an hour. This helps to wake up the dormant yeast and bacteria.
By following these steps, you’ll be well-prepared to restart your sourdough starter. For more detailed instructions on activating sourdough starter from the fridge, refer to our comprehensive guide.
Restarting a sourdough starter can seem daunting, but with the right materials and preparation, you'll be on your way to baking delicious sourdough bread in no time. For more information on feeding sourdough starter from the fridge and other related topics, explore our other articles.
Restarting Your Sourdough Starter
Restarting your sourdough starter after it has been stored in the fridge is a crucial step to ensure it remains active and healthy. Follow these steps to bring your starter back to life.
Removing Your Starter from the Fridge
Begin by taking your sourdough starter out of the fridge. Allow it to come to room temperature before proceeding. This can take anywhere from 1 to 2 hours. Letting it warm up will make the starter more responsive to the feeding process.
Discarding and Feeding Your Starter
Once your starter is at room temperature, it's time to discard and feed it. Discarding part of the starter helps to refresh it and ensures that it doesn't become too acidic. Here's a step-by-step guide:
- Weigh Your Starter: Measure the total weight of your starter.
- Discard: Remove about half of the starter. The exact amount can vary, but a common ratio is to keep 50 grams and discard the rest.
- Feed: Add equal parts of flour and water to the remaining starter. The typical feeding ratio is 1:1:1 (starter:flour:water).
| Step | Action | Amount |
|---|---|---|
| Weigh Starter | Measure total weight | Variable |
| Discard | Remove half | ~50% of total |
| Feed | Add flour and water | 1:1:1 ratio |
For example, if you have 100 grams of starter, discard 50 grams, and then add 50 grams of flour and 50 grams of water to the remaining 50 grams of starter.
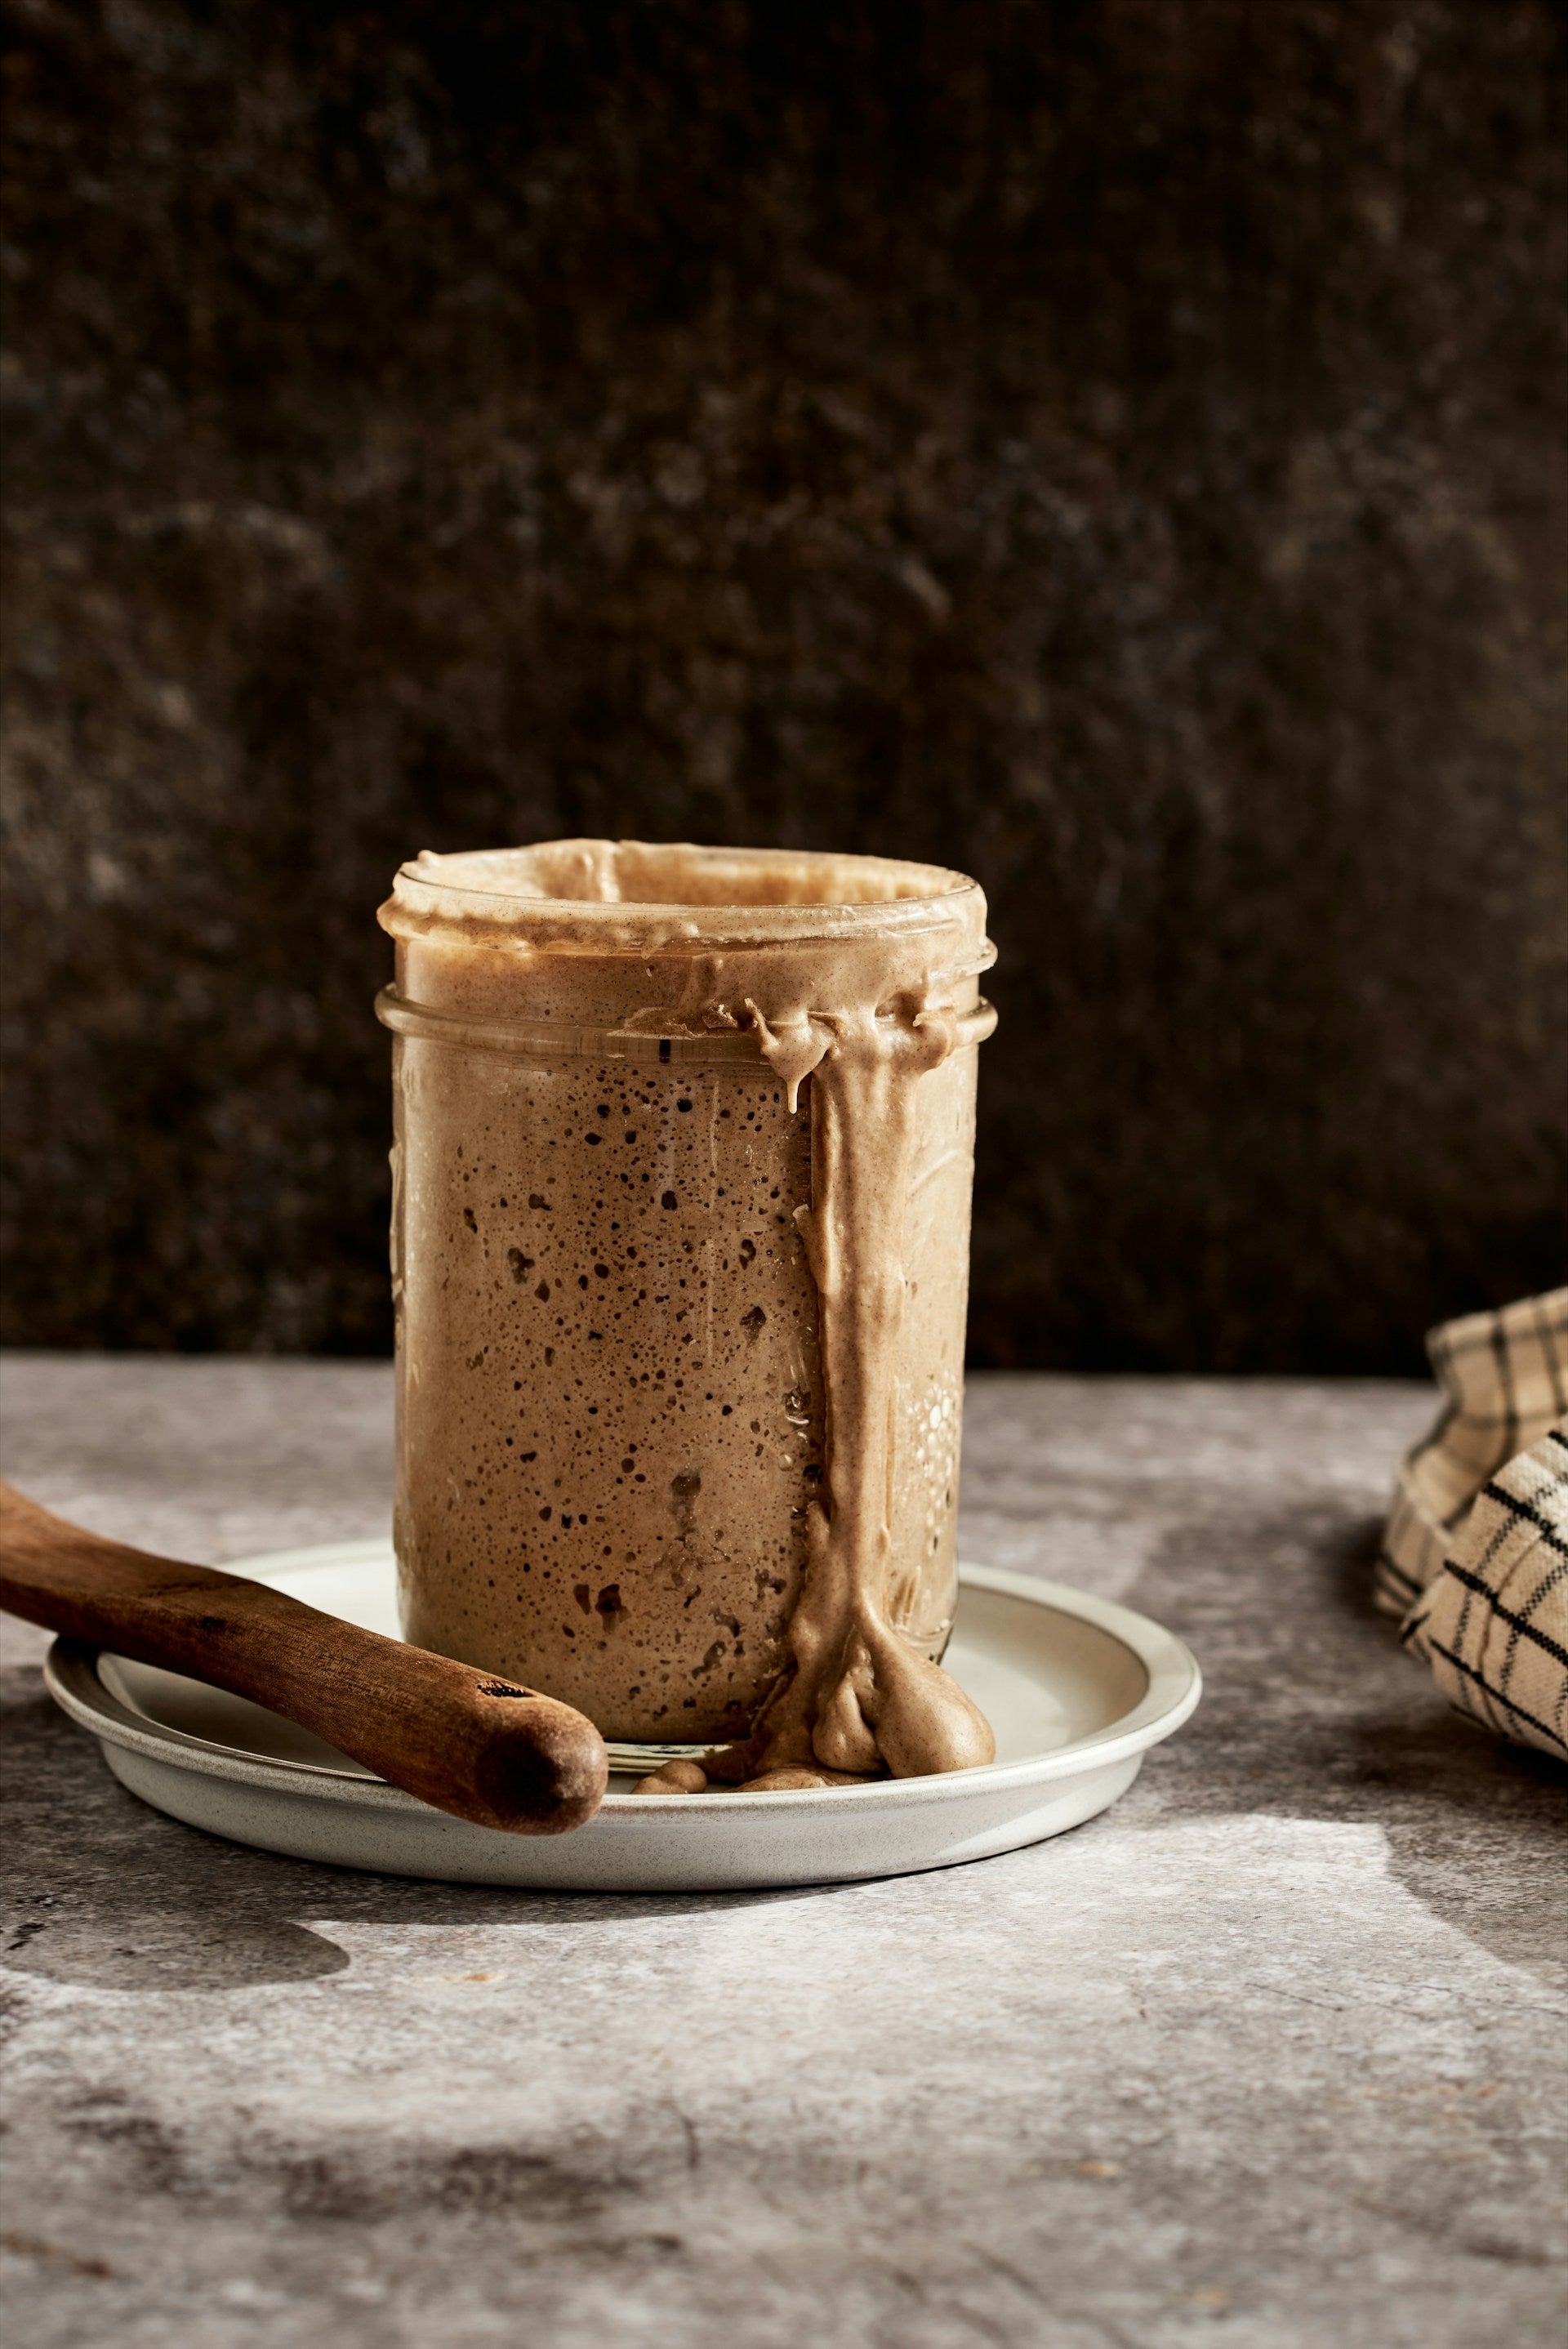
After feeding, mix the starter thoroughly to combine the flour and water. Cover the container loosely to allow gas to escape and let the starter sit at room temperature. You should start to see bubbles and activity within a few hours.
For more detailed information on feeding your starter, visit our article on feeding sourdough starter from the fridge.
By following these steps, you will ensure that your sourdough starter is active and ready for your next baking project. For additional tips and tricks, check out our article on baking sourdough after proofing in the fridge.
Understanding the Feeding Process
Properly feeding your sourdough starter is essential to maintain its health and activity. The feeding process involves the right ratio of flour to water and considering timing and temperature factors.
Ratio of Flour to Water
Feeding your sourdough starter requires a balanced ratio of flour to water. The most common ratio is 1:1 by weight. This means for every gram of flour, you add an equal amount of water. This balance helps maintain the consistency and activity of your starter.
| Ingredient | Amount (by weight) |
|---|---|
| Flour | 50 grams |
| Water | 50 grams |
| Starter | 50 grams |
This 1:1:1 ratio ensures your starter gets the nourishment it needs while maintaining the right hydration level. Adjusting the ratio can affect the starter's activity and consistency. For more detailed guidance on feeding, you can refer to our article on feeding sourdough starter from the fridge.
Timing and Temperature Considerations
The timing of feedings and the temperature at which you keep your starter are crucial for its health and activity. Here are key points to consider:
Feeding Frequency: When you restart your sourdough starter from the fridge, it may need more frequent feedings initially. Aim to feed it twice a day until it becomes active and bubbly. Once it stabilizes, you can reduce feedings to once a day or every 12 hours.
Temperature: The ambient temperature affects the fermentation rate of your starter. Ideally, keep your starter in a warm place, around 70-75°F (21-24°C). Cooler temperatures slow down fermentation, while warmer temperatures speed it up.
Monitoring: After each feeding, observe the starter's activity. Look for signs such as bubbles, a rise in volume, and a pleasant sour aroma. These indicators suggest that your starter is healthy and active. For troubleshooting tips, you can visit our article on signs of starter activity.
By understanding the feeding process, including the right ratio of flour to water and considering timing and temperature, you can ensure your sourdough starter remains healthy and ready for baking. For more tips and in-depth information, explore our articles on activating sourdough starter from the fridge and feeding sourdough starter in the fridge.
Monitoring Your Starter
Once you have restarted your sourdough starter from the fridge, it's important to keep a close eye on it to ensure it becomes active and healthy. Monitoring your starter will help you determine if it needs any adjustments and allow you to troubleshoot common issues.
Signs of Starter Activity
An active sourdough starter will show several signs that indicate it is healthy and ready for baking. Look for the following indicators:
- Bubbling: The presence of bubbles on the surface and throughout the starter is a sign of fermentation.
- Rising and Falling: The starter should rise and then fall within a 4 to 12-hour period after feeding.
- Sour Aroma: A tangy, sour smell indicates that the wild yeast and bacteria are active.
- Elastic Texture: The starter should feel stretchy and elastic when stirred.
| Indicator | Description |
|---|---|
| Bubbling | Presence of bubbles indicates fermentation |
| Rising and Falling | Starter rises and falls within 4 to 12 hours |
| Sour Aroma | Tangy, sour smell indicates active fermentation |
| Elastic Texture | Stretchy and elastic when stirred |
Troubleshooting Common Issues
If your starter isn't showing signs of activity, there may be underlying issues that need to be addressed. Here are some common problems and their solutions:
No Bubbles or Rise: If your starter isn't bubbling or rising, it may need more frequent feedings. Increase the feeding intervals and ensure you are using the correct ratio of flour to water. For detailed feeding instructions, visit our article on feeding sourdough starter from the fridge.
Unpleasant Smell: A foul odor can indicate that your starter has gone bad. Discard a portion of the starter and feed it with fresh flour and water. Make sure to keep your starter in a clean, well-ventilated area.
Watery Consistency: If your starter is too runny, it may need more flour. Adjust the flour-to-water ratio to achieve a thicker consistency. Check out our guide on how to feed a sourdough starter from the fridge for more tips.
Mold Growth: Mold can develop if the starter is not fed regularly or if it is kept in an unsanitary environment. Discard any moldy portions and transfer the starter to a clean container. Increase feeding frequency to prevent future mold growth.
For more troubleshooting tips and detailed instructions on how to address these issues, visit our article on maintaining sourdough starter in the fridge.
Monitoring your starter closely and addressing any issues promptly will ensure that your sourdough remains active and ready for baking. For more information on incorporating your starter into recipes, check out our article on baking sourdough after proofing in the fridge.
Incorporating Your Starter
Using Your Starter in Recipes
Once your sourdough starter has been successfully revived from the fridge, it’s time to put it to use in various recipes. Sourdough starter can be used in a multitude of baked goods, from traditional sourdough bread to pancakes, waffles, and even pizza dough. Using a well-maintained starter will ensure that your baked goods have the characteristic tangy flavor and airy texture that sourdough is known for.
Here are some common uses for your sourdough starter:
- Sourdough Bread: The classic use for your starter. Mix your active starter with flour, water, and salt, then let it ferment and rise before baking.
- Pancakes and Waffles: Use your starter to add a unique flavor and fluffy texture to your breakfast favorites.
- Pizza Dough: Incorporate your starter into pizza dough for a deliciously tangy crust.
For detailed instructions on how to use your sourdough starter in these recipes, refer to our guide on how to make sourdough bread from starter in the fridge.
Storing Your Starter for Future Use
Proper storage of your sourdough starter is crucial for maintaining its health and usability. When not in active use, your starter can be stored in the fridge to slow down its activity and reduce the frequency of feedings needed.
Short-Term Storage
For short-term storage (up to a week), keep your starter in a clean, airtight container in the fridge. Make sure to feed it at least once a week to keep it active and healthy. For more on this, see our article on feeding sourdough starter in the fridge.
Long-Term Storage
For long-term storage (more than a week), the process is slightly different. Here’s a simple guide:
- Feed Your Starter: Give your starter a hearty feed before storing it. This will ensure it has enough food to last during the storage period.
- Store in the Fridge: Place the fed starter in an airtight container and store it in the fridge. It can be left for several months, but you should still check on it periodically.
- Revive When Needed: To revive a long-stored starter, take it out of the fridge, let it come to room temperature, and start feeding it regularly. This will bring it back to its active state.
| Storage Duration | Feeding Frequency | Steps to Revive |
|---|---|---|
| Up to 1 week | Weekly | Normal feeding |
| More than a week | Monthly | Gradual feeding increase |
For more insights on long-term storage and maintenance, visit our article on how long can you keep sourdough starter in the fridge?.
By following these steps, you can ensure your sourdough starter remains healthy and ready for use whenever you need it. Whether you're making a fresh loaf of sourdough bread or experimenting with new recipes, a well-maintained starter is the key to success. For more tips and tricks, check out our articles on activating sourdough starter from the fridge and feeding sourdough starter from the fridge.
Get Your Upgrade or New Addition at Fridge.com
Whether you're searching for your perfect fridge, freezer, wine fridge, beer fridge, ice maker, or kegerator, we have what you need.
Shop the world's best brands at Fridge.com.
We also have tons of awesome articles about kitchen stuff and home news. Enhance your home, garage, backyard, patio, and office with the coolest essentials. With every necessary type of residential refrigerator or freezer in our collection, we've got you covered.
Elevate your game and shop now at Fridge.com!