How To Use Sourdough Starter From The Fridge
Bringing Your Sourdough Starter Back to Life
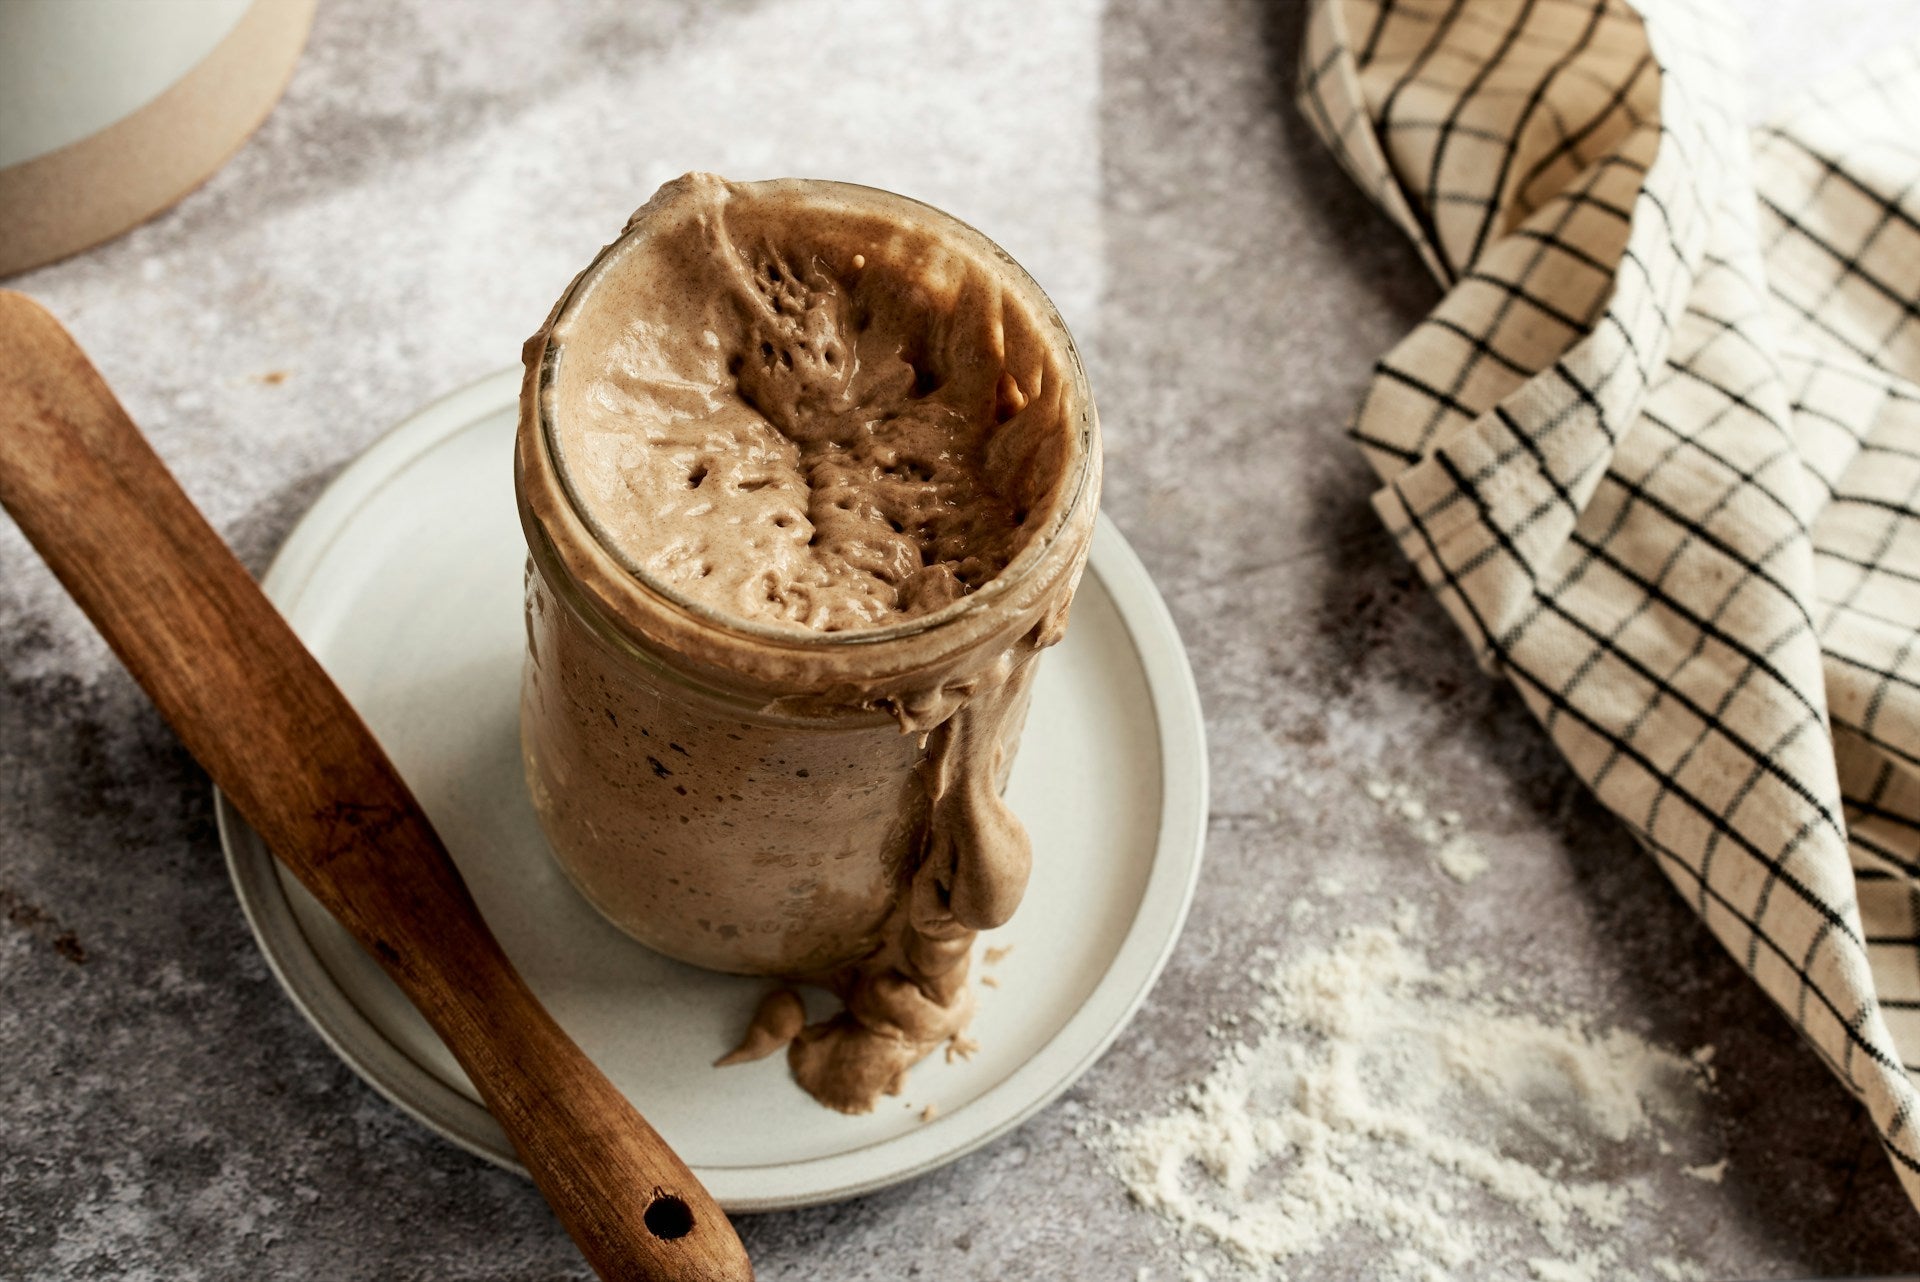
Reviving a sourdough starter from the fridge involves a few essential steps to ensure your starter is active and ready for baking.
Importance of Properly Maintaining Your Sourdough Starter
Maintaining your sourdough starter is crucial for successful baking. A well-maintained starter produces the right amount of natural yeast and bacteria, which are responsible for the unique flavor and texture of sourdough bread. Regular feeding and proper storage are key to keeping your starter healthy and active.
Steps to Revive Your Sourdough Starter from the Fridge
To bring your sourdough starter back to life after being stored in the fridge, follow these steps:
Take Your Starter Out of the Fridge: Remove the jar of starter from the fridge and let it come to room temperature. This usually takes about 1-2 hours.
-
Discard and Feed Your Starter: Once the starter is at room temperature, discard about half of it. This helps to reduce acidity and refresh the starter. Then, feed it with equal parts of flour and water by weight.
Step Action Quantity 1 Discard 50% of starter 2 Feed with Flour Equal weight to starter 3 Feed with Water Equal weight to starter Mix Thoroughly: Stir the mixture well to incorporate air and ensure the flour is fully hydrated.
Leave at Room Temperature: Allow the starter to sit at room temperature for 4-6 hours or until it becomes bubbly and doubles in size.
Repeat Feeding: If your starter is sluggish, you may need to repeat the discard and feed process a couple of times over the next 24-48 hours. This helps to build up the strength of the starter.
For more detailed instructions, check out our guide on activating sourdough starter from the fridge.
By following these steps, you can ensure your sourdough starter is active and ready for use. Interested in learning about long-term storage? Visit our article on storing sourdough starter in the fridge.
Preparing Your Sourdough Starter
Reviving your sourdough starter from the fridge involves a few simple steps to ensure it becomes active and ready for baking. Here's a detailed guide on how to prepare your starter.
Taking Your Starter Out of the Fridge
When you're ready to use your sourdough starter, the first step is to take it out of the fridge. Cold temperatures slow down the fermentation process, so your starter will need some time to come back to life. Let it sit at room temperature for a few hours. This allows the natural yeast and bacteria to wake up and become active again.
Discarding and Feeding Your Starter
Once your starter has warmed up, it's time to discard and feed it. Discarding a portion of the starter is crucial because it helps maintain the right balance of yeast and bacteria. Here's how you can do it:
- Measure Your Starter: Take a look at the amount of starter you have. It's usually recommended to keep around 1/4 cup (60 grams) of starter.
- Discard the Excess: Remove and discard the excess starter. You can use this discard for other recipes or store it in the fridge. For more on storing discard, visit our article on can i put sourdough discard in the fridge?.
- Feed Your Starter: Add equal parts of flour and water to the remaining starter. For example, if you have 1/4 cup (60 grams) of starter, add 1/4 cup (60 grams) of flour and 1/4 cup (60 grams) of water. Mix it well until it reaches a smooth consistency.
| Measurement | Starter | Flour | Water |
|---|---|---|---|
| Volume | 1/4 cup | 1/4 cup | 1/4 cup |
| Weight | 60 grams | 60 grams | 60 grams |
After feeding, cover the container loosely and let it sit at room temperature for several hours. During this time, you should see bubbles forming and the volume of the starter increasing. This indicates that the yeast and bacteria are active and fermenting the mixture. If you need more guidance on feeding, check out our article on feeding sourdough starter from the fridge.
By following these steps, your sourdough starter should be active and ready for baking. For more tips on baking with sourdough, visit our article on baking sourdough after proofing in the fridge.
Testing Your Sourdough Starter
Ensuring your sourdough starter is active and ready for baking is crucial. Two reliable methods for testing your starter are the float test and assessing its activity.
Conducting the Float Test
The float test is a simple way to determine if your sourdough starter is active and ready for baking. Here's how to conduct the float test:
- Take a small spoonful of your sourdough starter.
- Gently drop it into a glass of water.
If the starter floats, it indicates that it's sufficiently fermented and filled with gas, making it ready for use. If the starter sinks, it may need more time to ferment or an additional feeding. For more detailed instructions on this process, you can refer to our article on activating sourdough starter from the fridge.
Assessing Starter Activity
Apart from the float test, you can assess the activity of your sourdough starter by observing its behavior over time. Active starters will show signs of vigorous fermentation. Here are the key indicators to look for:
- Bubbles: A healthy starter will have many bubbles throughout, indicating active fermentation.
- Rise and Fall: The starter should double in size within 4-6 hours after feeding and then start to collapse.
- Aroma: It should have a pleasant, slightly tangy smell.
| Indicator | Active Starter | Inactive Starter |
|---|---|---|
| Bubbles | Many bubbles throughout | Few or no bubbles |
| Rise and Fall | Doubles in size within 4-6 hours | Little to no rise |
| Aroma | Pleasant, slightly tangy smell | Off, unpleasant smell |
If your starter shows these signs of activity, it's ready for baking. If not, it may need additional feedings or more time to ferment. For more guidance on maintaining your starter, refer to our article on feeding sourdough starter from the fridge.
By using these methods, you can ensure your sourdough starter is active and ready to create delicious baked goods. For further tips on baking with sourdough, explore our article on tips for baking with sourdough.
Using Your Sourdough Starter
With your sourdough starter revived and active, it's time to put it to use. Below are some recipes and ideas for making the most out of your sourdough starter, along with tips for baking with sourdough.
Recipes and Ideas for Using Your Starter
Your sourdough starter can be used in a variety of recipes beyond just bread. Here are some popular options:
- Sourdough Bread: The classic choice. You can try different variations like whole wheat or rye.
- Sourdough Pancakes: A great way to use excess starter and enjoy a tangy twist on a breakfast favorite.
- Sourdough Pizza Crust: Adds a unique flavor to your homemade pizza.
- Sourdough Crackers: Perfect for a crunchy snack.
- Sourdough Muffins: Adds depth to your muffins, making them more flavorful.
For a step-by-step guide on making sourdough bread, check out our article on how to make sourdough bread from starter in the fridge.
Tips for Baking with Sourdough
Baking with sourdough can be a rewarding experience, but it requires some know-how to get the best results:
Timing and Fermentation
- Proofing: Allow your dough to rise until it has doubled in size. This can take anywhere from 4 to 12 hours depending on the temperature and activity of your starter.
- Overnight Proofing: You can proof your sourdough in the fridge overnight for a slower fermentation process. Learn more in our article can i put my sourdough in the fridge overnight?.
Dough Handling
- Stretch and Fold: This technique helps develop gluten and gives your bread structure.
- Shaping: Proper shaping is crucial for achieving a good rise and crust. Practice makes perfect.
Baking
- Preheat Your Oven: Ensure your oven is fully preheated to the required temperature. Using a baking stone or Dutch oven can help achieve a better crust.
- Steam: Creating steam in the oven can help your bread develop a nice crust. You can do this by placing a pan of water in the oven or using a spray bottle.
Common Issues and Fixes
- Dense Bread: This can be due to under-proofing or not enough gluten development. Make sure to give your dough enough time to rise and perform adequate stretch and folds.
- Flat Loaf: Often caused by over-proofing. Keep an eye on your dough and don't let it rise too much before baking. For more troubleshooting tips, visit our article on troubleshooting your sourdough starter.
By following these tips and exploring different recipes, you can fully enjoy the versatility and unique flavors that sourdough has to offer. For more ideas and tips, check out our article on baking sourdough after proofing in the fridge.
Storing Your Sourdough Starter
Maintaining Your Sourdough Starter in the Fridge
Proper maintenance of your sourdough starter is essential to keep it active and healthy. Storing your starter in the fridge is a convenient way to slow down its activity when you don't plan to bake frequently. Here's how to maintain your sourdough starter in the fridge:
- Feeding Frequency: Feed your starter once a week. Discard a portion, then add equal parts flour and water.
- Consistency: Ensure the mixture is well combined and has a consistent texture.
- Container: Use a clean, airtight container to store your starter.
- Labeling: Label the container with the date of the last feeding.
For more detailed steps on feeding your starter, visit our guide on feeding sourdough starter from the fridge.
| Activity | Frequency |
|---|---|
| Feeding | Once a week |
| Discarding | Before each feeding |
| Mixing | Until smooth |
Long-Term Storage Options for Your Starter
If you need to store your sourdough starter for an extended period, consider these methods:
Drying Your Starter
- Spread: Spread a thin layer of starter on parchment paper.
- Dry: Let it dry completely in a cool, dry place.
- Store: Break the dried starter into flakes and store in an airtight container.
Freezing Your Starter
- Feed: Feed your starter and let it become active.
- Portion: Divide the starter into small portions.
- Freeze: Place portions in airtight containers or freezer bags and freeze.
For more information on long-term storage, check out how to keep sourdough starter in the fridge.
| Method | Steps | Duration |
|---|---|---|
| Drying | Spread, Dry, Store | Several months |
| Freezing | Feed, Portion, Freeze | Up to 6 months |
Maintaining your sourdough starter effectively ensures you always have a ready-to-use base for your baking adventures. Explore more tips on activating sourdough starter from the fridge to make the most of your starter.
Troubleshooting Your Sourdough Starter
Common Issues with Sourdough Starters
Maintaining a healthy sourdough starter can sometimes present challenges. Several common issues might arise, especially when dealing with a starter that has been stored in the fridge. Here are some frequent problems and their symptoms:
- Hooch Formation: A layer of liquid forms on top of the starter.
- Foul Odor: The starter emits a strong, unpleasant smell.
- Lack of Bubbles: The starter shows no signs of fermentation.
- Inactive Starter: The starter fails to rise after feeding.
| Issue | Symptoms |
|---|---|
| Hooch Formation | Liquid layer on top |
| Foul Odor | Strong, unpleasant smell |
| Lack of Bubbles | No bubbles or signs of fermentation |
| Inactive Starter | Starter does not rise after feeding |
Solutions to Revive a Sluggish Starter
If your sourdough starter shows signs of inactivity or other issues, don’t worry. Here are some effective solutions to bring it back to life:
Hooch Formation: Stir the hooch back into the starter or pour it off before feeding. If your starter has been in the fridge for a long time, it might need multiple feedings to regain its strength.
Foul Odor: Discard a portion of the starter and refresh it with equal parts water and flour. This helps in diluting any built-up acids causing the smell.
Lack of Bubbles: Ensure your starter is kept in a warm environment (70-75°F or 21-24°C). Feed it with a higher ratio of flour to water to encourage fermentation.
Inactive Starter: Feed your starter twice a day for a few days. Use equal parts of flour and water to strengthen the starter. You can also add a pinch of whole grain flour to boost fermentation.
For more details on maintaining and feeding your starter, refer to feeding sourdough starter from the fridge.
| Solution | Action |
|---|---|
| Hooch Formation | Stir back in or pour off, feed multiple times if needed |
| Foul Odor | Discard portion, refresh with equal parts water and flour |
| Lack of Bubbles | Keep in warm environment, feed with higher ratio of flour to water |
| Inactive Starter | Feed twice a day, use equal parts flour and water, add whole grain flour |
For more in-depth tips, explore our guide on how to revive sourdough starter from the fridge. If you encounter persistent issues, our feeding sourdough starter in the fridge article may offer additional insights.
By understanding these common problems and their solutions, you can ensure your sourdough starter remains healthy and active, ready for baking delicious sourdough bread.
Experimenting with Your Sourdough Starter
Customizing Your Sourdough Recipes
Experimenting with your sourdough starter can lead to unique and delicious results. Customizing recipes allows you to tailor the flavor, texture, and appearance of your bread to suit your preferences. Here are a few ways you can tweak your sourdough recipes:
Adjust the Hydration Level: The hydration level refers to the ratio of water to flour in your dough. Higher hydration levels (above 75%) result in a more open crumb and a chewier texture, while lower hydration levels (around 60-65%) produce a denser loaf.
Fermentation Time: Extending the fermentation time can develop deeper flavors. You can achieve this by letting the dough rise in the fridge overnight. For more on this, read can I put my sourdough in the fridge overnight?.
Incorporate Mix-Ins: Adding ingredients such as seeds, nuts, dried fruits, or herbs can enhance the flavor and texture of your bread. Mix these in during the initial mixing stage or fold them in during the first stretch and fold.
Shape Variations: Experiment with different shapes like boules, batards, or baguettes to see how the dough responds and to create visually appealing loaves.
Scoring Patterns: Scoring your bread not only helps control the expansion of the dough but also allows for creative designs on the crust.
Incorporating Different Flours and Ingredients
Incorporating various flours and ingredients can drastically change the outcome of your sourdough bread. Here are some ideas to get you started:
Whole Wheat Flour: Adding whole wheat flour can increase the nutritional content and add a nutty flavor to your bread. Start by substituting 20-30% of the bread flour with whole wheat flour.
Rye Flour: Rye flour can give your bread a denser texture and a slightly tangy flavor. It also helps in achieving a moist crumb. Use in combination with bread flour, substituting 10-20%.
Spelt Flour: Spelt flour adds a sweet and nutty flavor to your bread. It has a lower gluten content, so it's best used in combination with bread flour.
Alternative Flours: Flours like oat, barley, or buckwheat can be used to add unique flavors and textures. These should be used in smaller percentages (10-15%) due to their differing protein structures.
Sweeteners: Adding honey, molasses, or maple syrup can enhance the flavor profile of your bread. Be cautious with the amount to avoid overly sticky dough.
Flour Substitution Table
| Flour Type | Substitution Percentage | Characteristics |
|---|---|---|
| Whole Wheat | 20-30% | Nutty flavor, increased nutrition |
| Rye | 10-20% | Dense texture, tangy flavor |
| Spelt | 20-30% | Sweet, nutty flavor |
| Oat, Barley, Buckwheat | 10-15% | Unique flavors and textures |
When experimenting with different flours and ingredients, it's essential to monitor the dough's hydration and adjust the water content accordingly. This ensures a consistent and workable dough.
Using these tips, you can create a variety of sourdough breads that cater to your taste and preferences. For more ideas, explore our articles on sourdough bread in the fridge and how to make sourdough bread from starter in the fridge. Happy baking!
Get Your Upgrade or New Addition at Fridge.com
Whether you're searching for your perfect fridge, freezer, wine fridge, beer fridge, ice maker, or kegerator, we have what you need.
Shop the world's best brands at Fridge.com.
We also have tons of awesome articles about kitchen stuff and home news. Enhance your home, garage, backyard, patio, and office with the coolest essentials. With every necessary type of residential refrigerator or freezer in our collection, we've got you covered.
Elevate your game and shop now at Fridge.com!