Moving a Chest Freezer
Preparing to move a chest freezer might seem like hauling a mountain, but fear not! With some handy tips, you can glide through the task without breaking a sweat. Let’s break it down.
What to Think About Before Moving Your Chest Freezer
Before you even think about lugging that big icebox across town – or even just across the room – there're a few things to mull over:
-
Size and Weight: Know your beast! Get the dimensions and the heft of your freezer. For those of you struggling with a behemoth like a 5.1 cu ft chest freezer, it's not a solo mission. Make sure you've got the right gear to move it safely.
-
Your Path: Got a clear runway? Scope out the route to your freezer's new digs. Got to squeeze past some tight spots or dodge a staircase? Hashtag awkward! These can all change how you plan your move.
-
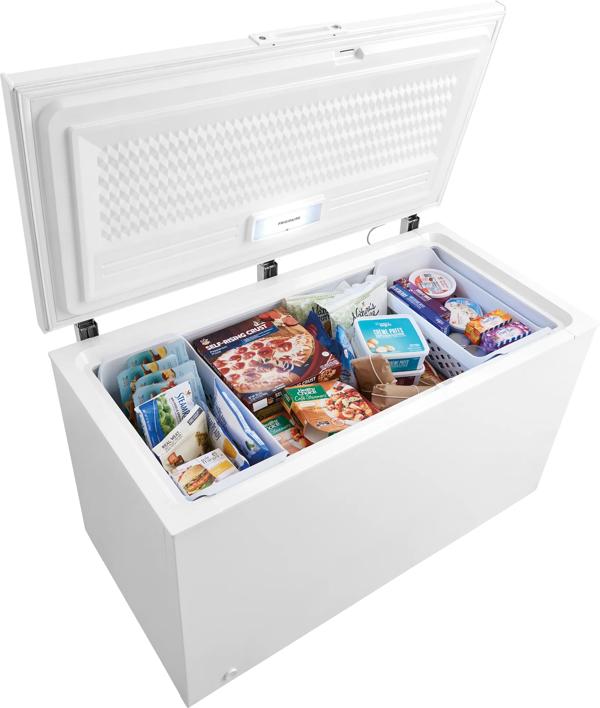
What's Inside: Time to go Marie Kondo on the contents. Empty that sucker out! This tricks it into being lighter and avoids a bumper car situation inside.
-
Electricity Situation: Is there juice at the new place? Make sure your freezer doesn't end up in a dark corner without the plug power it craves.
Get Set for the Big Move
A little prep goes a long way in making moving day a breeze. Here's the game plan:
-
Defrosting: Got iceberg problems? Defrost at least a day in advance. Less lake, less hassle.
-
Sprucing Up: Give it the VIP treatment with a clean-up. Sweep out those crumbs and smells—warm soapy water does wonders.
-
Lockdown: Tie or tape those doors shut like Indiana Jones sealing up a treasure trove. Trust me, you don't want them flying open mid-move.
-
Gear Up: Ready your forces—grab a dolly, some sturdy straps, and don’t forget the cozy blankets to keep it scratch-free.
-
Caller a Friend: Faced with a heavyweight? Phone a pal or get the pros in. Don’t be the hero who slips a disc.
With these steps, your freezer will be chilling in its new space in no time. But hold on! Before you plug it back in, wait a hot minute. Check out when to give it power again in our article on how long do you need to wait to plug in a freezer after moving it?.
After Moving Your Chest Freezer
Setting It Down Safely
Alright, so you’ve hauled your chest freezer to its fresh new spot. Let’s make sure you’re setting it down with the care it deserves. Find a flat area, where it's not wobbling like it's had one too many. Steer clear of sunbathing spots or snuggling up to your heater; both can mess with how cool it keeps your ice cream. Give it some breathing room with two inches all around for good airflow – important for doing its job right!
Balance is key here. An off-kilter freezer might not just be louder than your usual fridge buzz; it might start acting up over time.
How Long to Wait Before Plugging In
You’ve got it settled in place, but hold up before you go plugging it in. Patience is important here, giving it time to get all its juices, er, oils back where they belong. You’re looking at a 24-hour downtime just to keep things on the safe side.
Here's a nifty cheat sheet on how long to chill (pun intended) before fueling it up with electricity:
| Scenario | Chill Time Needed |
|---|---|
| Moved upright (sideways) | 6 - 12 hours |
| Moved on its side | 24 hours |
| Shuffled a short distance | 4 - 8 hours |
To dive deeper, you might wanna check out this article on freezer settling times. This waiting game helps keep your freezer ticking along nicely and extends its working years.
Understanding the Stabilization Period
Why Wait Time is Important
So, you've just hauled your chest freezer across town and you're itching to plug it in. But hold on a sec! Giving your freezer a breather before giving it power is as crucial as making sure you grab those moving boxes out of the truck. This pause lets the freezer's inner parts get their act together, especially the compressor and refrigerator magic juice (yep, the refrigerant!). Flip that switch too quick, and you might send them into a tizzy, possibly messing up how they work.
Experts say, take a chill pill and wait about 4 to 6 hours before you crank it up. But if the freezer's been hitching a ride on its side, you’re looking at 24 to 48 hours of downtime to let everything settle back where it belongs.
| Freezer Situation | Recommended Hang Time |
|---|---|
| Upright Ride | 4 to 6 hours |
| Sideways Adventure | 24 to 48 hours |
Temperature Equilibrium Process
Okay, let’s talk about keeping things cool—literally. When your freezer's been on the move, the cozy equilibrium it had gets thrown off. Letting it sit lets all those inner parts, the refrigerant and the oil doing their slow dance, find their groove again.
During this chill time, the freezer's insides get to cozy up to the right temperatures, which means fewer sweaty walls or other funky stuff happening from temperature whiplash. If it’s been through a temperature roller coaster, especially, this is crucial. Staying chill now means your grub stays safe and sound in the long run, and you keep that trusty freezer humming along smoothly.
Wondering about how long this cooling off party takes? Check out our piece on how long does it take for a refrigerator to get cold after plugging it up?.
By pulling the brakes a bit and prepping your freezer right, you're looking at a win for freshness, function, and keeping this crucial kitchen buddy running strong.
Getting Your Freezer Ready
So you’ve just made it through the tornado of a move, and now you’re looking at your chest freezer like, “What now?” Don’t sweat it! Let’s get this big fella up and running with a few simple steps to make sure it's chilling like a pro.
Powering up Your Chest Freezer
First things first, plug that bad boy in. But, hang on—it's important to check if the outlet's all systems go. If your neighborhood's electrical current likes to perform its own version of the cha-cha, a surge protector is your dance partner to keep your appliance safe. Here's your straight-to-the-point list for turning it on:
| Step | Action |
|---|---|
| 1 | Connect the freezer to a grounded outlet. |
| 2 | Avoid sharing the outlet with other heavyweight gadgets. |
| 3 | Crank that temp control to the sweet spot, somewhere between -5°F and 0°F. |
| 4 | Let it hum away for a couple of hours before loading it up with your frozen goodies. |
Keep a close eye in those first hours. You want to nip any hiccups in the bud fast.
Checking for Optimal Operating Conditions
Alright, it’s plugged in and purring. Now, let's make sure your freezer’s set to be the reliable rockstar you need for keeping food fresh as your last beach-side BBQ. Here’s the lineup:
-
Temperature: Grab a thermometer (not for your fever) and see if the inside lands at 0°F or lower within a day. If not, give the manual a squizz or ring up a tech wiz.
-
Seals and Gaskets: Those door seals shouldn’t just stick—they should suck like a good handshake. No gaps, no drafts getting in.
-
Ventilation: Let the beast breathe. Ensure there's room for fresh air to move around all sides—freedom, baby!
| Condition | Recommended Check |
|---|---|
| Temperature | Should chill at 0°F or less |
| Door Seals | Grippy and tight |
| Ventilation | Airflow on all sides |
Once these bases are covered, you're all set! But hang tight before filling 'er up—check out our fabulous guide for even more freezer know-how.
Tips for Efficient Use
Want to keep your chest freezer running like a champ and your food in top shape? Sure you do! Check out these nifty tricks to boost efficiency and put an end to the chaos of frozen food avalanches.
Organizing Your Freezer
Avoiding the iceberg of doom (aka a messy freezer) can make your meal prep dreams come true. Here's how:
-
Bin It Up: Use bins to lump similar stuff together. Toss all your veggies into one, meats into another, and keep those tasty ready-to-eat meals in their own cozy bin.
-
Labelling Magic: Stick some labels on 'em! Jot down what's in each bin and the date you threw it in there. Bingo—you've reduced food waste and can find things without spelunking.
-
Smart Stacking: Start with flat stuff at the bottom, like pizzas or leftover lasagna trays, and stack the tiny goodies on top. It's like building a very chilly house of cards.
-
Keep it Chill (Literally): Pack enough to cuddle your food but leave space to let the air do its thing. This way, everything stays at the right chill factor.
Need more guidance? Here’s an idea of what should go where:
| Category | Example Items |
|---|---|
| Vegetables | Frozen peas, corn, and that veggie medley |
| Meats | Chicken, ground beef, hot dogs |
| Meals | Grandma's lasagna, casseroles, soup from Sunday |
| Snacks | Ice cream (yesss), pizzas, and breakfast burritos |
Maintaining and Cleaning Your Freezer
Giving a little TLC to your freezer's guts ensures it doesn’t die or smell like last week’s lunch. Here’s what to do:
-
Scrub-a-Dub: Every so often, empty it out and give it a clean with some mild soap and warm water. Say goodbye to funk and germs.
-
Seal Check: Run your fingers along those door seals. You need them smooth, no sneaky cracks. If they’re worn out, switch 'em up before they let your cash slip away in energy bills.
-
Thermometer Time: Make friends with a thermometer. Keep your freezer at 0°F (-18°C) or lower so your eats stay safe and solid.
-
Nip Frost: If there's an ice layer thicker than your patience, it’s time to defrost. Icebergs belong in the ocean, not in your freezer.
-
Be a Freezer Whisperer: Keep it at least 3/4 full; the more the merrier when it comes to maintaining temperature. Just remember, it's not a clown car—overcrowding leads to cold chaos.
Keeping these tips in mind will save you moolah on bills and make your food happier. Hungry for more freezer hacks? Learn about how long do you need to wait to plug in a chest freezer after moving it?.