Understanding No Knead Bread
What is No Knead Bread?
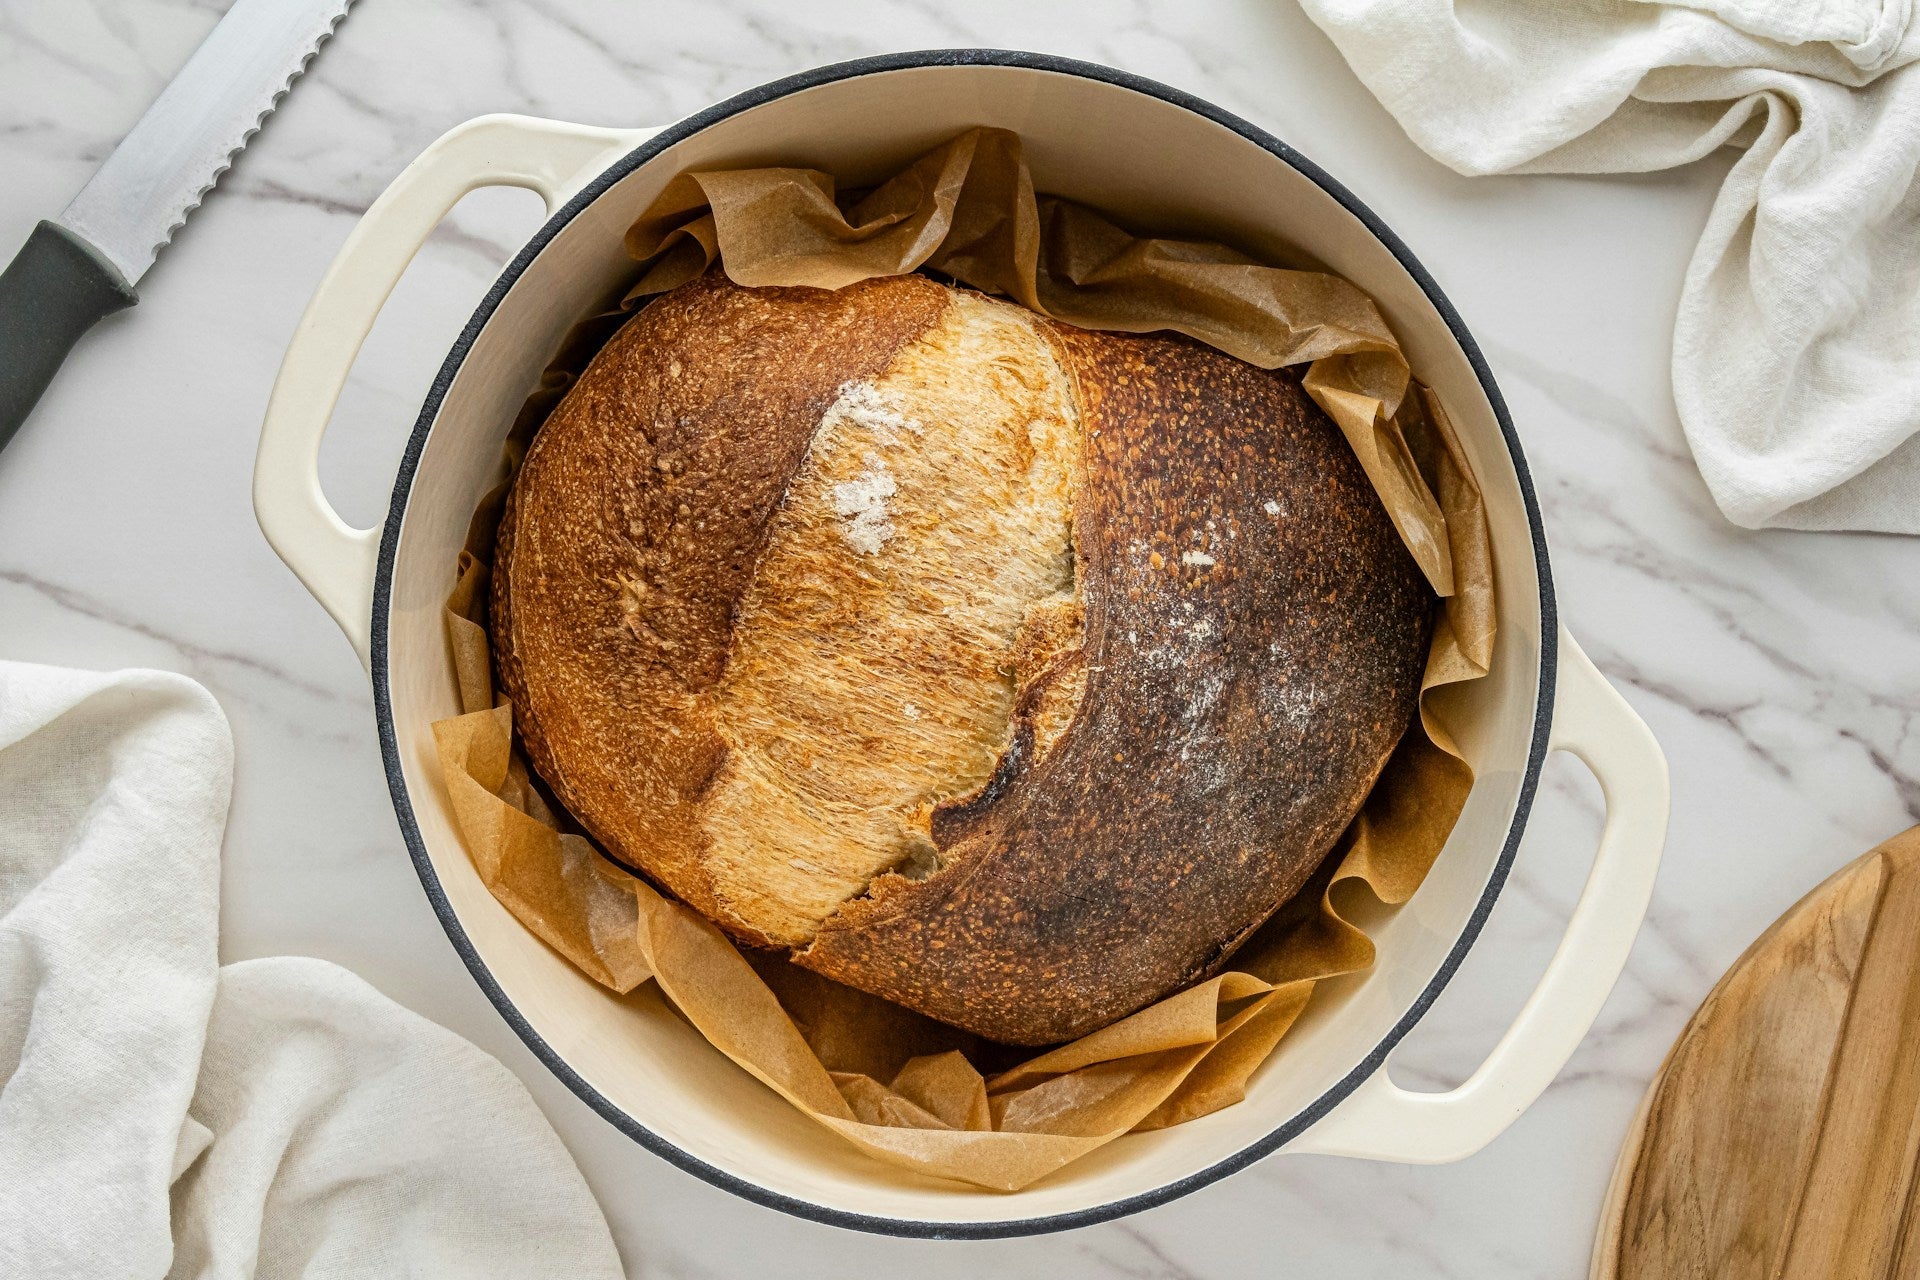
No knead bread is a type of bread that eliminates the need for extensive kneading. The dough requires minimal mixing, allowing the gluten to develop through a long fermentation process. This method produces a rustic, artisan-style loaf with a crispy crust and chewy interior. The simplicity of the recipe and the minimal effort involved make it a popular choice among both novice and experienced bakers.
| Characteristic | Description |
|---|---|
| Mixing Time | 5-10 minutes |
| Fermentation Time | 12-18 hours |
| Kneading | Not required |
| Crust | Crispy |
| Interior | Chewy |
Benefits of Making No Knead Bread
Making no knead bread offers several advantages that appeal to a wide range of individuals, from busy homeowners to passionate foodies.
- Ease of Preparation: The minimal effort required means you spend less time in the kitchen, making it perfect for busy schedules.
- Flavor Development: The long fermentation process allows for complex flavors to develop, resulting in a rich and delicious loaf.
- Texture: The method produces a bread with a superior texture, featuring a crunchy crust and a soft, airy crumb.
- Versatility: No knead bread can be easily customized with various ingredients like herbs, seeds, and dried fruits, catering to different tastes and preferences.
- Cost-Effective: Making bread at home is often more economical than purchasing artisanal loaves from bakeries.
The benefits extend beyond just the baking process. Proper storage, such as using a budget fridge freezer or a family fridge freezer, can help maintain the freshness of your no knead bread. Whether you're storing it in the fridge or considering freezing it, understanding the best practices ensures you enjoy your homemade bread to the fullest.
Storing No Knead Bread in the Fridge
Proper storage of your no knead bread in the refrigerator can make a significant difference in the quality and longevity of your dough. This section will cover the importance of refrigeration and the correct storage techniques.
Importance of Refrigerating No Knead Bread
Refrigerating no knead bread dough is essential for several reasons. First, it allows the dough to develop more complex flavors by fermenting slowly over time. The cold temperature slows down yeast activity, giving the dough a longer period to rise and develop a richer taste.
Second, refrigeration ensures that the dough remains fresh until you are ready to bake it. This is especially useful if you have a busy schedule and need to prepare the dough in advance. Keeping the dough in the fridge can extend its shelf life, preventing it from over-proofing or going bad.
Lastly, refrigerated dough is easier to handle and shape. The cooler temperature firms up the dough, making it less sticky and more manageable when it's time to bake.
Proper Storage Techniques
Storing your no knead bread dough in the fridge requires a few simple steps to ensure it stays fresh and ready for baking.
- Covering the Dough: Use a bowl large enough to allow the dough to expand. Cover the bowl with plastic wrap or a damp kitchen towel to prevent the dough from drying out.
- Container Choice: Alternatively, you can use an airtight container. This method is particularly effective if you plan to store the dough for several days.
- Labeling: Label the container with the date you prepared the dough. This helps you keep track of how long the dough has been in the fridge.
- Temperature: Keep the dough in the main compartment of the refrigerator where the temperature is consistent. Avoid placing it in the fridge door, which can experience temperature fluctuations.
| Storage Method | Pros | Cons |
|---|---|---|
| Bowl with Plastic Wrap | Easy to cover, reusable | May not be airtight |
| Airtight Container | Keeps dough fresh longer, stackable | Requires proper sealing |
| Damp Kitchen Towel | Prevents drying out, eco-friendly | May need frequent rewetting |
By following these storage techniques, you can ensure that your no knead bread dough remains in optimal condition until you're ready to bake. For more information on organizing your fridge for maximum efficiency, check out Fridge.com article on the most organized fridge.
Remember, proper storage is key to maintaining the quality of your no knead bread dough. Whether you’re using a bowl with plastic wrap or an airtight container, ensuring that your dough is properly covered and stored at the right temperature will make all the difference. For more tips on fridge maintenance and storage, explore Fridge.com article on life span of a fridge.
Retrieving and Baking Chilled Dough
For those who love the convenience of no knead bread, storing the dough in the fridge can be a game-changer. Properly retrieving and baking your chilled dough ensures a delicious, fresh loaf every time.
Bringing Chilled Dough to Room Temperature
When you're ready to bake your no knead bread, it's essential to bring the chilled dough to room temperature. This step allows the dough to rise properly and improves the final texture of your bread.
- Remove Dough from Fridge: Take the dough out of the fridge and place it on your countertop.
- Cover the Dough: Cover the dough with a damp cloth to prevent it from drying out.
- Wait for Rising: Allow the dough to sit at room temperature for 1-2 hours. The exact time may vary depending on the ambient temperature in your kitchen.
| Step | Duration |
|---|---|
| Remove Dough from Fridge | 0 minutes |
| Cover with Damp Cloth | 1 minute |
| Wait for Rising | 60-120 minutes |
Baking Tips for Refrigerated No Knead Bread
Once your dough has reached room temperature, it's time to bake. Here are some tips to ensure your refrigerated no knead bread bakes perfectly:
- Preheat Your Oven: Preheat your oven to 450°F (232°C). Place your baking vessel (such as a Dutch oven) inside to heat up.
- Shape the Dough: Lightly flour your work surface and shape the dough into a ball. Place it on a piece of parchment paper for easy transfer.
- Score the Dough: Use a sharp knife to make a few slashes on the surface of the dough. This helps the bread expand during baking.
- Bake with Steam: Carefully transfer the dough (with parchment paper) into the preheated baking vessel. Cover with a lid to create steam, which helps achieve a crispy crust.
- Bake Time: Bake covered for 30 minutes. Remove the lid and bake for an additional 10-15 minutes until the crust is golden brown.
| Step | Temperature | Duration |
|---|---|---|
| Preheat Oven | 450°F (232°C) | 30 minutes |
| Shape Dough | N/A | 5 minutes |
| Score Dough | N/A | 1 minute |
| Bake Covered | 450°F (232°C) | 30 minutes |
| Bake Uncovered | 450°F (232°C) | 10-15 minutes |
For more tips on storing and baking dough, check out Fridge.com articles on most organized fridge and freezing garlic bread. Proper technique ensures your no knead bread fridge experience is always a success.
Freezing No Knead Bread
When to Consider Freezing No Knead Bread
Freezing no knead bread is a great option if you have made more dough than you can use or if you want to save some for later. By freezing the dough, you can conveniently have fresh bread whenever you need it without the hassle of starting from scratch. It is especially useful for families, busy individuals, and those who enjoy entertaining guests.
Consider freezing no knead bread dough if:
- You want to prepare in advance for a special occasion.
- You have leftover dough after a baking session.
- You wish to maintain the freshness of the dough for longer periods.
Steps for Freezing and Thawing
Properly freezing and thawing no knead bread dough ensures that it retains its quality and rises well when baked. Follow these steps for best results:
Freezing No Knead Bread Dough
- Prepare the Dough: Follow your usual recipe for no knead bread dough.
- Initial Rise: Allow the dough to rise as you normally would.
- Portion the Dough: Divide the dough into portions suitable for freezing. This helps in thawing only what you need.
- Shape and Wrap: Shape the dough into balls or loaves. Wrap each portion tightly in plastic wrap.
- Place in Freezer Bags: Place the wrapped dough portions into freezer bags. Remove as much air as possible before sealing.
- Label and Freeze: Label the bags with the date and type of dough. Place them in the freezer.
Thawing No Knead Bread Dough
- Transfer to Fridge: Move the frozen dough from the freezer to the refrigerator. Allow it to thaw overnight or for about 8-12 hours.
- Room Temperature: Once thawed, let the dough come to room temperature for 1-2 hours.
- Final Rise: Allow the dough to undergo a final rise at room temperature until it doubles in size.
| Step | Action | Time Required |
|---|---|---|
| Initial Rise | Let dough rise | As per recipe |
| Thawing | In fridge | 8-12 hours |
| Room Temperature | Before baking | 1-2 hours |
For more detailed guidance on storing and retrieving chilled dough, you can refer to Fridge.com article on storing no knead bread in the fridge. Additionally, if you're interested in preserving other types of food, check out Fridge.com tips on freezing turkey stock and freezing garden beans.
Reviving Frozen No Knead Bread
Methods for Reheating Frozen No Knead Bread
Reviving frozen no knead bread requires proper reheating methods to restore its original texture and flavor. Below are some effective techniques:
Oven Method
- Preheat the Oven: Set your oven to 350°F (175°C).
- Wrap the Bread: Wrap the frozen bread in aluminum foil to prevent it from drying out.
- Bake: Place the wrapped bread on a baking sheet and bake for 20-30 minutes.
- Check for Warmth: Unwrap the foil and check if the bread is warmed through. If not, rewrap and continue baking for another 5-10 minutes.
Microwave Method
- Place on Microwave-Safe Plate: Position the frozen bread on a microwave-safe plate.
- Cover with Damp Paper Towel: This helps retain moisture.
- Microwave: Heat on medium power for 30-second intervals until warmed through.
Toaster Oven Method
- Preheat Toaster Oven: Set to 350°F (175°C).
- Wrap in Foil: Similar to the oven method.
- Bake: Place in the toaster oven for 15-20 minutes.
Air Fryer Method
- Preheat Air Fryer: Set to 300°F (150°C).
- Place Bread in Basket: Do not overcrowd.
- Heat: Air fry for 10-15 minutes, checking halfway through.
Tips for Maintaining Freshness
Maintaining the freshness of no knead bread involves careful handling and storage:
- Cool Completely: Ensure the bread is completely cooled before freezing to avoid condensation.
- Wrap Properly: Use plastic wrap followed by aluminum foil to minimize freezer burn.
- Label and Date: Mark the date of freezing to keep track of its storage time.
| Storage Method | Maximum Duration |
|---|---|
| Freezer (0°F/-18°C) | 3 months |
| Refrigerator (35°F/2°C) | 1 week |
For more on storing and freezing foods, explore Fridge.com articles on freezing turkey stock and freezing garlic bread.
By following these methods and tips, you can enjoy your no knead bread just as fresh as when it was first baked.
Get Your Upgrade or New Addition at Fridge.com
Whether you're searching for your perfect fridge, freezer, wine fridge, beer fridge, ice maker, or kegerator, Fridge.com has what you need.
Shop the world's best brands at Fridge.com.
It also has tons of awesome articles about kitchen stuff and home news. Enhance your home, garage, backyard, patio, and office with the coolest essentials. With every necessary type of residential refrigerator or freezer in the collection, you're covered.
Elevate your game and shop now at Fridge.com!