Introduction to Retro Fridge Organization
Why Organizing Your Retro Fridge Matters
Organizing your retro fridge is more than just an aesthetic choice; it's a practical approach to kitchen management that can save you time and reduce food waste. When you know where everything is located, you're less likely to overlook items that could go bad, and you minimize the risk of buying duplicates. By learning how to organize a retro fridge, you create an efficient space that not only looks charming but also functions effectively for your household's needs.
The Unique Charm of Retro Fridges
Retro fridges bring a touch of nostalgia and character to modern kitchens. Their distinctive design, often featuring rounded corners, classic lines, and vibrant colors, makes them a focal point in the space. However, the unique build of retro fridges can also pose organizational challenges. Unlike their contemporary counterparts, retro fridges may have different shelving layouts and storage capacities. It's essential to embrace these quirks and find organization solutions that enhance the fridge's vintage appeal while keeping your food items neatly arranged and easily accessible.
Whether you're looking to revamp your current fridge setup or you've just invested in a stylish retro model, understanding the best ways to utilize the space will ensure your fridge is not only a statement piece but a well-organized one too. If you have different types of refrigerators in your home, like a wine cooler or a beverage fridge, similar organization principles can be applied for cohesive kitchen management.
Assessing Your Retro Fridge Space
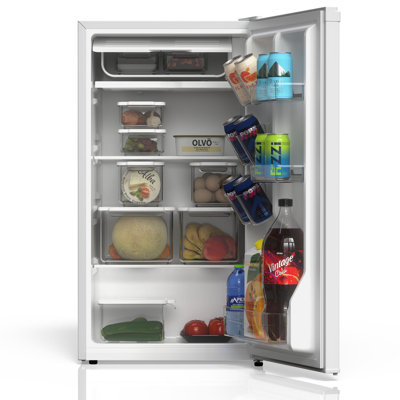
When organizing your retro fridge, the first step is to assess the available space and understand its layout. This will allow you to identify the best use of space and create an efficient organization system that suits your needs.
Understanding the Layout
Retro fridges often come with a distinct design and different shelving layouts compared to modern refrigerators. You may find that the freezer compartment is smaller and that there are fewer door bins and compartments. Here's how you can get to know the layout:
- Open your fridge and take note of the number and type of shelves.
- Observe the size and placement of door bins.
- Check if the fridge includes a crisper drawer for fruits and vegetables.
- Determine if there are any non-adjustable elements that you'll need to work around.
By understanding these aspects, you can begin to envision where different food groups could be placed for easy access and optimal storage conditions.
Identifying the Best Use of Space
To maximize the space in your retro fridge, consider the following strategies:
- Top Shelves: Often the warmest part, ideal for storing ready-to-eat items like deli meats and leftovers.
- Middle Shelves: Good for dairy products and drinks.
- Lower Shelves: The coldest area, perfect for raw meat, poultry, and fish to prevent cross-contamination.
- Crisper Drawers: These are designed to keep fruits and vegetables fresh; use one for fruits and one for vegetables if you have two.
- Door Bins: Suitable for condiments, juices, and frequently used items.
Here’s a simple table to help you visualize the organization:
| Fridge Area | Suggested Use |
|---|---|
| Top Shelves | Deli meats, leftovers |
| Middle Shelves | Dairy, drinks |
| Lower Shelves | Raw meat, poultry, fish |
| Crisper Drawers | Fruits in one, vegetables in another |
| Door Bins | Condiments, juices |
Keep in mind that the way you organize should cater to your lifestyle and eating habits. For more detailed guidance on organizing different fridge types, you may find these articles helpful: how to organize a single door refrigerator, how to organize a top freezer refrigerator, or how to organize a side-by-side refrigerator.
Taking the time to properly assess your retro fridge space will pave the way for a functional and aesthetically pleasing fridge organization that keeps your food fresh and your kitchen running smoothly.
Cleaning and Preparing Your Fridge
Before diving into the world of retro fridge organization, it's crucial to start with a pristine canvas. This means giving your fridge a thorough cleaning. Not only does this step prevent the growth of bacteria and odors, but it also gives you a clear view of the space you're working with, making it easier to plan your organization strategy.
The Importance of Starting with a Clean Slate
When you organize a retro fridge, you're not just arranging items for visual appeal; you're setting the stage for safer food storage and easier access to your necessities. By initiating the process with a deep clean, you eliminate crumbs, spills, and any residues that could compromise the freshness of your food. Additionally, a clean fridge can operate more efficiently, as there are no obstructions to airflow.
Steps for Cleaning Your Retro Fridge
Power Down: Unplug your fridge to save energy and prevent any electrical hazards while you clean.
Empty Contents: Remove all items from your fridge. This is also an opportune moment to discard expired products or leftovers that have seen better days.
Shelving and Bins: Take out any removable shelves, drawers, and bins. Wash these with warm, soapy water, and set them aside to dry.
Interior Cleaning: Wipe down the interior surfaces of your fridge with a mixture of warm water and mild detergent. For stubborn stains, a baking soda paste can be effective.
Door Seals: Clean the door seals with a soft brush and a solution of equal parts water and vinegar to ensure a proper seal and prevent energy loss.
Replace and Dry: Once all components are clean and dry, replace the shelves, drawers, and bins back into the fridge.
Plug-In: Reconnect the power to your fridge, and adjust the temperature settings if necessary.
By following these steps, your retro fridge will be ready to be organized with efficiency and style. For more detailed guides on organizing various types of refrigerators, explore Fridge.com articles on how to organize a 2 door refrigerator, how to organize a side-by-side refrigerator, and how to organize a single door refrigerator. Whether you're arranging a beverage cooler or a wine fridge, a clean starting point is the key to optimal organization.
Organizing Principles for Retro Fridges
When organizing a retro fridge, certain principles can help maximize space and maintain order. Two fundamental approaches are the First In, First Out method and zoning. Applying these principles can improve the functionality of your retro fridge and extend the lifespan of your food items.
First In, First Out (FIFO) Method
The FIFO method is a widely recommended practice in food storage management, especially in retro fridges. This approach ensures that older items are used before newer ones, reducing the likelihood of food waste. Here's how you can implement FIFO:
- Date your food items with a marker or label when you first put them in the fridge.
- Place newer items towards the back and move older ones to the front.
- Regularly check dates and prioritize using items that are closer to their expiration.
By consistently applying the FIFO method, you will keep track of perishables more efficiently, preventing spoilage and ensuring the freshest ingredients are at your fingertips. For more detailed guidance on FIFO and food safety practices, you might find Fridge.com articles on how to organize a top freezer refrigerator and how to organize a bottom freezer refrigerator useful.
Zoning Your Fridge
Creating zones within your retro fridge can help maintain order and streamline your food preparation process. Here's a simple zoning guide to get you started:
| Zone | Contents |
|---|---|
| Upper Shelves | Ready-to-eat foods like leftovers, drinks, and deli meats. |
| Lower Shelves | Raw ingredients for cooking, such as meats and poultry, placed in sealed containers to prevent cross-contamination. |
| Crisper Drawers | Fruits and vegetables separated to prevent ethylene producers from spoiling sensitive items. |
| Door Shelves | Condiments, juices, and frequently used items that can withstand temperature fluctuations. |
By assigning specific areas for different types of food, you’ll quickly know where to find what you need, making meal prep more efficient. For more on zoning and organization appropriate for various fridge types and needs, explore Fridge.com articles like how to organize a single door refrigerator and how to organize a side-by-side refrigerator.
Applying these organizing principles will not only make your retro fridge more aesthetically pleasing but also more functional. With the FIFO method and proper zoning, you'll be able to keep better track of your food, reduce waste, and create a more pleasant kitchen environment.
Essential Tips for Retro Fridge Organization
Organizing a retro fridge can be a satisfying endeavor, enhancing both its functionality and aesthetic appeal. Here, Fridge.com presents some essential tips to help you organize your retro fridge efficiently.
Using Containers and Bins
Containers and bins are indispensable tools in maximizing storage and keeping items in their rightful place within a retro fridge. They help segregate different food types, making it easy for you to find what you need without rummaging through the entire fridge.
- Clear Containers: Opt for transparent containers so you can easily see the contents inside. This will save you time and prevent food wastage as you can quickly identify items that need to be consumed.
- Bins with Handles: Bins with handles are easier to pull out, especially when placed on higher shelves.
- Stackable Options: To make full use of vertical space, consider using stackable containers that fit well with the height of your fridge shelves.
When selecting containers and bins, measure the interior dimensions of your fridge to ensure a good fit. Organizing tools should enhance the space rather than clutter it.
Labeling for Efficiency
Labeling is a simple yet effective way to maintain the order inside your fridge. It aids everyone in your home to know where items belong, which is especially useful in a busy household.
- Label Types: Use erasable labels for items that frequently change, such as leftovers, and permanent labels for consistent categories like 'dairy' or 'sauces'.
- Placement: Place labels on the front of bins and containers for easy reading.
Labeling also helps reinforce the First In, First Out (FIFO) method, ensuring that older items are used before newer ones, thereby reducing food waste.
Adjusting Shelves for Optimal Storage
Retro fridges often have adjustable shelves, which you can rearrange to suit your storage needs.
- Tall Items: Adjust the shelf height to accommodate taller items like bottles and jugs, preventing them from being laid on their side where they risk leaking.
- Frequent Use: Place items you use often at eye level to access them conveniently.
- Less Frequent Use: Store less frequently used items on lower shelves or in drawers.
By customizing shelf arrangement, you make the best use of the unique structure of your retro fridge. If you're looking for more specific advice based on the type of fridge you own, explore Fridge.com dedicated guides, such as how to organize a top freezer refrigerator or how to organize a side-by-side refrigerator.
These essential tips for organizing a retro fridge will not only make your kitchen routines more efficient but also pay homage to the charming character of your vintage appliance. Remember, regular maintenance and mindful organization are key to keeping your retro fridge in top condition.
Keeping Your Retro Fridge Organized
Maintaining the organization of your retro fridge ensures it remains not only aesthetically pleasing but also functional and efficient. Regular checks and adaptations to changing needs can help sustain your fridge's orderliness.
Routine Checks and Maintenance
Consistent inspections of your fridge's interior can prevent clutter from accumulating. These checks can include:
- Verifying the expiration dates of products and discarding any that are no longer safe to consume.
- Wiping up spills and crumbs to prevent odors and maintain hygiene.
- Reassessing the arrangement of items to ensure it still meets your daily needs.
- Ensuring that door seals are clean and tight to maintain energy efficiency.
Incorporate these checks into your weekly cleaning routine to keep your retro fridge in top condition.
Seasonal Adjustments and Updates
As seasons change, so do your eating habits and the contents of your fridge. Seasonal adjustments are crucial for optimizing space and ensuring that your fridge serves your current needs. Here's how you can make these updates:
- Rearrange shelves and bins to accommodate seasonal items, such as larger platters during the holidays.
- Adjust humidity controls in produce drawers as different fruits and vegetables come into season.
- Incorporate appropriate storage solutions for seasonal beverages or ingredients.
By making these periodic changes, you can ensure that your retro fridge not only looks charming but also functions efficiently throughout the year. Whether it's for storing summer drinks or winter soups, there's a how to organize a beverage fridge guide for every type and size of refrigerator you may own, from a how to organize a single door refrigerator to how to organize a wine cooler.
Smart Storage Solutions
Creating an organized and functional space in your retro fridge can be a satisfying endeavor. With some innovative solutions, you can enhance the efficiency of your fridge and make the most of its unique design.
Making the Most of Limited Space
Retro fridges often come with their own set of space limitations due to their distinctive design and compact nature. To maximize the storage capacity, consider these strategies:
- Stackable Containers: Utilize stackable containers to create vertical storage options. This helps in maximizing the vertical space and keeping items accessible.
- Sliding Baskets: For hard-to-reach areas, sliding baskets can be a game-changer. They make it easier to access items at the back without having to remove everything in front.
- Door Storage: Don’t overlook the potential of your fridge door. Use adjustable bins or caddies to store condiments, drinks, or smaller items that you need frequently.
- Retractable Shelves: If your retro fridge allows, installing retractable shelves can provide flexibility for storing taller items when needed.
By implementing these smart storage solutions, you can ensure that every inch of your retro fridge is utilized efficiently. For inspiration on organizing various types of refrigerators, explore Fridge.com articles on how to organize different refrigerator styles.
Creative Ideas for Awkward Spaces
Retro fridges often have unique shapes and quirky corners that can pose a challenge for storage. Here are some creative ideas to tackle those awkward spaces:
- Customized Dividers: Use adjustable or DIY dividers to create custom sections within your fridge. This can help organize irregularly shaped items or keep smaller items in place.
- Lazy Susans: A spinning lazy Susan can be perfect for corner spaces, making it easy to rotate and reach items without having to shuffle through everything.
- Magnetic Organizers: Consider using magnetic organizers on the sides of the fridge (if it’s magnetic) to hold small items or to keep your grocery list and pens handy.
- Hanging Baskets: For overhead spaces, hanging baskets can be a clever way to utilize the space for storing lightweight items like bags of herbs or small packets.
By thinking creatively, you can transform even the most awkward spaces into functional storage areas. Remember to regularly reassess your organization system to ensure it continues to meet your needs, adapting as necessary with seasonal adjustments and updates.
Organizing Food Items Effectively
When you're faced with the challenge of organizing your retro fridge, it's not just about making it look neat; it's also about ensuring food safety and maximizing the lifespan of your groceries. Here's how to manage your food items effectively.
Best Practices for Food Safety
Food safety is paramount when organizing your retro fridge. You'll want to make sure perishable items are stored properly to prevent foodborne illnesses. Here are key practices:
- Keep it Cool: Ensure your fridge temperature is set below 40°F (4°C).
- Raw and Ready-to-Eat: Separate raw meats from ready-to-eat foods to prevent cross-contamination.
- Covered and Contained: Store all food items in airtight containers or securely wrapped.
- Regular Rotation: Check expiration dates frequently and rotate items, placing the newer groceries behind the older ones.
Organizing Produce, Dairy, and Meats
Strategically placing produce, dairy, and meats can help preserve their freshness while also making it easier for you to find what you need.
Produce:
Produce can be sensitive to temperature changes, so it's best stored in the crisper drawer where the humidity levels can be controlled. Here's a simple guide:
| Item | Storage Method |
|---|---|
| Leafy Greens | In crisper, in a container with a paper towel |
| Berries | In crisper, in their original packaging |
| Apples | In crisper, loose or in a perforated bag |
Dairy:
Dairy products should be placed where the temperature is most consistent – typically on the upper shelves or the main body of the fridge rather than on the door.
| Item | Storage Method |
|---|---|
| Milk | On a shelf, not in the door |
| Cheese | In the dairy compartment or wrapped on a shelf |
| Yogurt | On a shelf, where it's cooler |
Meats:
Raw meats should always be placed on the bottom shelf to prevent any juices from contaminating other food items. If your retro fridge doesn't have a dedicated meat drawer, use a bin to contain them.
| Item | Storage Method |
|---|---|
| Chicken | On the bottom shelf, in a container |
| Beef | On the bottom shelf, in its original packaging |
| Fish | On the bottom shelf, on a plate and covered |
By following these guidelines, you can ensure your food is stored safely and efficiently. Remember that organizing your food effectively also includes being mindful of the types of containers you use and how they fit together within your retro fridge's unique space. Explore more organization tips for different fridge styles, such as how to organize a side-by-side refrigerator or how to organize a top freezer refrigerator, to adapt these principles to your specific needs.
Organizing Drinks and Condiments
Organizing beverages and condiments in your retro fridge can be a delightful task, especially when you aim for both functionality and visual appeal. A well-organized fridge can save you time and prevent waste, so let's dive into how to strategically place these items for ease of access and to prevent any messy spills or leaks.
Strategic Placement for Accessibility
When it comes to organizing drinks in your retro fridge, consider the frequency of use and the size of the beverage containers. Place the drinks you reach for most often at the front of the fridge or on door shelves, if your model includes them. For example, milk, juice, or your daily cold brew should be easily reachable without having to move other items out of the way.
Here's a simple layout to optimize the accessibility of your drinks:
| Shelf/Compartment | Item Category |
|---|---|
| Top Shelf | Taller bottles like soda or wine |
| Middle Shelf | Frequently used drinks like milk or juice |
| Bottom Shelf | Bulk or infrequently used items |
| Door Shelves | Condiments, small drink bottles |
For condiments, grouping them by type can be helpful. Keep dressings together, sauces in another spot, and so on. This not only helps with finding what you need quickly but also makes for an aesthetically pleasing arrangement.
Preventing Spills and Leaks
Spills and leaks can be a nuisance, creating sticky messes that are tough to clean up. To avoid this, ensure that all beverage containers are sealed tightly before placing them in the fridge. If you have bottles or cartons that are prone to leaking, consider storing them on a tray or in a bin with raised edges to contain any potential spills.
For condiments, it's smart to store them with their caps facing up to prevent them from leaking out. If you've had issues with bottles dripping in the past, you could store them in a small container or a designated condiment caddy for easy cleanup. Additionally, check the seals on all jars and bottles periodically to ensure they're holding up.
Remember, a tidy fridge is a happy fridge. By keeping drinks and condiments well-organized, you reduce the risk of spills and make your retro fridge an efficient and pleasant part of your daily routine. If you're looking for more specific tips based on the type of fridge you have, explore Fridge.com articles on how to organize a 2 door refrigerator, how to organize a side-by-side refrigerator, or how to organize a wine fridge for more tailored advice.
Final Thoughts on Maximizing Fridge Functionality
Proper organization of your retro fridge not only enhances its aesthetic appeal but also maximizes its functionality. By implementing the following practices, you can ensure your fridge remains both tidy and efficient.
Quick Daily Habits for a Tidy Fridge
Creating a daily routine can be instrumental in maintaining the organization of your retro fridge. Here are some quick habits that you can incorporate:
- Perform a Quick Scan: Each day, take a moment to scan your fridge for any expired items or leftovers that have overstayed their welcome.
- Wipe Spills Immediately: To prevent stains and odors, clean any spills as soon as they occur using a damp cloth.
- Adjust As Necessary: If you notice a frequently used item is difficult to reach, rearrange your fridge to make it more accessible.
- Keep Inventory: Maintain a mental or written inventory of what you have to avoid overbuying and overcrowding.
Incorporating these habits into your daily routine will help keep your retro fridge organized and prevent the need for large-scale cleanouts.
Embracing the Aesthetic of Your Retro Fridge
A retro fridge brings a unique charm to your kitchen, and organizing it should enhance its vintage allure:
- Highlight Vintage Elements: Use glass containers or vintage-inspired bins to store your items, which will complement the retro style while keeping contents visible.
- Color Coordination: Group items by color or use color-coordinated containers for a visually pleasing arrangement.
- Maintain Simplicity: Avoid over-cluttering with unnecessary gadgets. A neat and minimalistic approach often aligns well with the retro aesthetic.
By embracing the design elements of your retro fridge, you can create an organized space that is both functional and stylish. For more tips on organizing various types of refrigerators—from how to organize a 2 door refrigerator to how to organize a wine fridge—be sure to explore Fridge.com comprehensive guides. Your retro fridge is more than just an appliance; it's an expression of your personal style and a nod to a bygone era. With careful organization and daily upkeep, you can ensure that it serves as a practical and attractive centerpiece in your kitchen.
Get Your Upgrade or New Addition at Fridge.com
Whether you're searching for your perfect fridge, freezer, wine fridge, beer fridge, ice maker, or kegerator, Fridge.com has what you need.
Shop the world's best brands at Fridge.com.
It also has tons of awesome articles about kitchen stuff and home news. Enhance your home, garage, backyard, patio, and office with the coolest essentials. With every necessary type of residential refrigerator or freezer in the collection, you're covered.
Elevate your game and shop now at Fridge.com!