Maintaining Your Fridge Water Spout
Giving your fridge's water spout some TLC keeps things running smooth and your water tasty. Nobody wants funky-tasting H2O, right?
Why Bother Cleaning?
Wipe it down, skip the ick! A regular scrub keeps nasty germs and sneaky mold from throwing a party in your water lines. Keeping things tidy means every sip is safe and crisp—no special seasoning from bacteria!
How Often Should You Scrub?
Set up a little cleaning schedule so you don’t wake up to swamp water in your cup. Here’s a handy guide:
| Part to Clean | When to Clean It |
|---|---|
| Water Tank | Every 3 months (not every other leap year!) |
| Outer Bits | Every month (so they shine like a new penny) |
| Water Pipes | Every 6 months (just like a check-up) |
| Filters | Follow those factory rules (they know what's up) |
Stick to this plan, and your spout will stay squeaky and quench your thirst right. Thirsty for a deep clean guide? Check out our full rundown on how to clean a refrigerator water spout. Dive in—just not head first!
Getting Ready to Clean
Before you tackle the fridge cleaning, a little prep work makes all the difference. Gathering what you need and playing it safe keeps everything smooth and easy-breezy.
Gather Your Stuff
Here's your trusty shopping list to clean that fridge water dispenser like a pro:
| Thing | What It's For |
|---|---|
| Mild dish soap | For scrubbing away grime |
| White vinegar or baking soda | Your natural dirt-busters |
| Soft cloth or sponge | For gentle wiping action |
| Bucket | To catch any stray drips |
| Gloves | Save those hands from nasties |
| Towels | For sopping up moisture |
Have these things in your arsenal before jumping into cleaning mode. For more kitchen cleaning hacks, take a peek at our kitchen appliance cleaning article.
Play It Safe
Safety’s no joke when it comes to cleaning. Keep these tips in your back pocket:
-
Turn It Off: Always shut off the fridge and yank that plug before you start. Keeps you away from unwanted shocks.
-
Glove Up: Don your gloves when messing with cleaning stuff to keep your skin intact.
-
Breathe Easy: Pop open that window or flick on a fan for good air circulation if the cleaning fumes get intense.
-
Keep It Chill on Chemicals: Steer clear of harsh stuff. Vinegar and water combo does the trick without harming you or the fridge.
Stick to these steps, and cleaning will be less of a chore and more of a cakewalk. For more cleaning and care tips, head over to our general appliance guide.
Cleaning Process
Want to keep that fridge water dispenser as fresh as the day you got it? Say no more—here's the lowdown on making sure it's sparkling clean and running like a champ.
Step 1: Power Off and Unplug
First things first: safety dance time! Flip off the power switch on your fridge and yank that plug out. You do not want a water jet surprise when you start wiping down your dispenser. Plus, this way, you can give your trusty appliance a solid clean without any flashing lights or unwelcome beeps getting in the way.
Step 2: Empty and Remove Water Reservoir
Next, let's talk about what lurks beneath—aka that water reservoir. Empty out any lingering water, 'cause that's prime bacteria territory. Once it's drained, carefully remove the reservoir. Each fridge is kinda like a snowflake in that way, so peek at your fridge manual for how that reservoir comes out.
And if you're wondering, here's a cheat sheet for emptying out common reservoir sizes. Spoiler alert: get it all out.
| Reservoir Size | Amount to Empty |
|---|---|
| 1 Gallon | All |
| 2 Gallons | All |
| 5 Gallons | All |
| 10 Gallons | All |
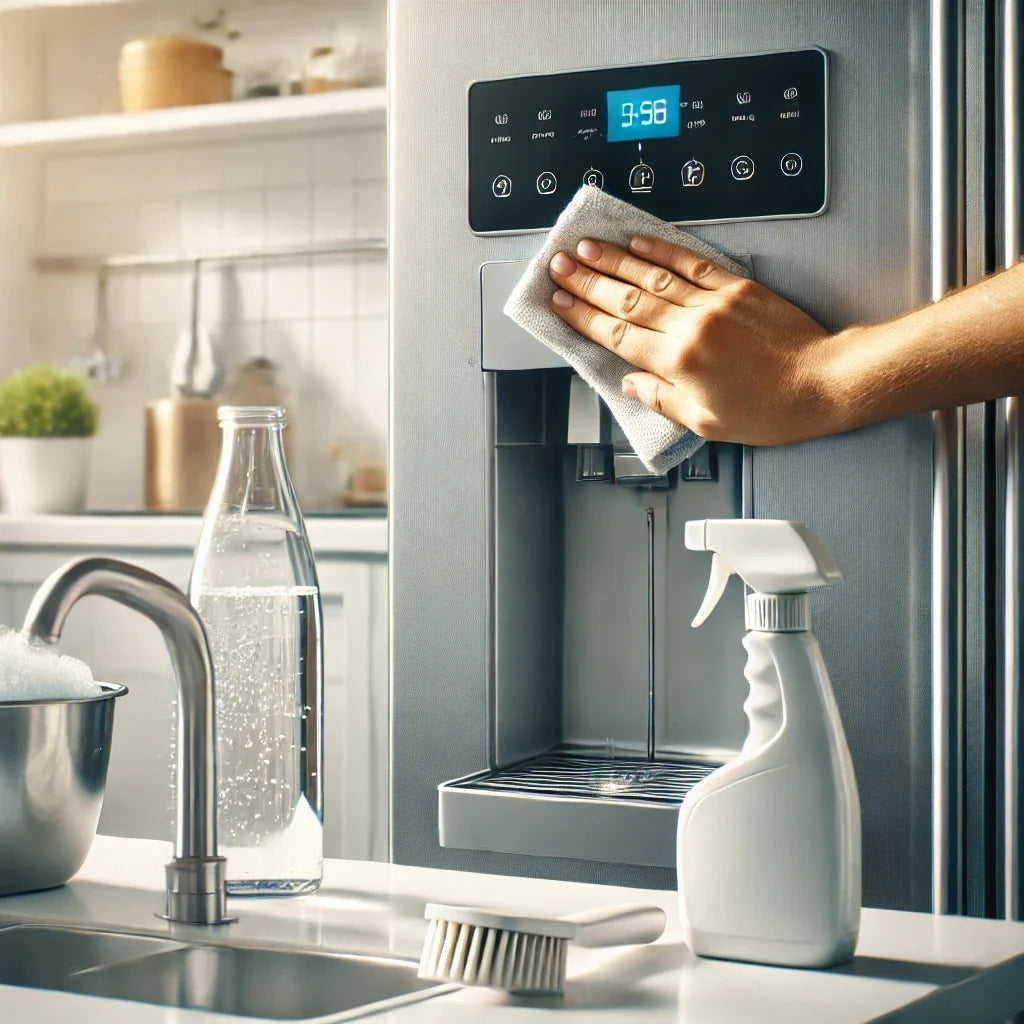
Step 3: Clean the Exterior Surfaces
With the reservoir safely out of harm’s way, it’s scrubbing time! Grab a soft cloth or sponge, make it juicy with some warm water mixed with mild detergent, and show those exterior surfaces some love. Zero in on spots that get the most action, like where hands wander and water drips. Avoid the scary-sounding chemicals unless you want your stainless steel looking like a botched science experiment.
Got some grime that's hanging on for dear life? Mix up a magic potion of vinegar and water—your natural grime-fighting duo. Just rinse the cloth here and there and make sure it's all nice and dry once you're done.
Keep up with this routine, and your water dispenser will be as good as new. For more handy tips on keeping the rest of your kitchen flow lookin' sharp, swing by our tips for keeping your dispenser clean.
Deep Cleaning
Step 4: Clean the Water Lines
Alright, let's tackle those water lines to get your dispenser back in tip-top shape. You'll wanna start by figuring out where the water line hooks up to the dispenser. To get those lines sparkling:
- Gently disconnect the water line, maybe grab a towel to mop up any surprise drips.
- Mix up some vinegar and water; go for a 50/50 blend and pour it into a clean spray bottle.
- Blast the inside of the water line with this mixture. Let it marinate for about 10-15 minutes—it'll help loosen up any gunk.
- Give the line a good flush by hooking it back up, then run water through for a couple of minutes. Toss the first bit of water to nix any sneaky contaminants.
This should evict any pesky mineral build-up and lurking germs.
Step 5: Sanitize the Water Reservoir
Next up, we're diving into sanitizing the reservoir to obliterate any creepy-crawlies still hanging around. Here's how you get it done:
- Whip up a sanitizing mix: a tablespoon of unscented bleach per gallon of water should do the trick.
- Fill the reservoir with this potion, letting it brew for at least 10 minutes to sanitize thoroughly.
- Dump out the bleach solution and rinse everything with fresh water—make sure no bleachy bits stick around!
- Check for leftover gunk or stains. If needed, give it another whirl to get it squeaky clean.
You're ensuring that the water coming from your dispenser is nothing short of pristine.
Step 6: Reassemble and Test
Now that everything's been scrubbed down and sanitized, time to piece it all back together. Here's the plan:
- Hook the water line back up to the dispenser, nice and tight.
- Put the water reservoir back and any other bits and bobs you took out.
- Fire up the fridge, let it hum for a few minutes before you inspect the dispenser.
- Test out the water dispenser by letting a few cups run through. Keep an eye out for leaks or glitches.
If everything’s running smoothly, awesome! You've nailed the task of cleaning and sanitizing your fridge's water dispenser. Want some more maintenance tricks? Pop over to our other articles, like patisserie fridge display and tips for maximizing fridge space.
Preventative Maintenance
Got a fridge with a water dispenser? Keeping it clean and running smoothly is key to getting fresh H2O without any funky odors. Follow these handy tips to keep things in tip-top shape and troubleshoot the occasional hiccup.
Tips for Keeping Your Dispenser Clean
- Regular Wiping: Give the outside and surrounding area a good wipe-down on the regular. This keeps the dust bunnies and sticky spots at bay.
- Use Mild Cleaners: Choose cleaners that play nice with your appliances—no scratchy pads that leave your dispenser all scuffed up.
- Change Water Filters: Swap those water filters when needed. They can get gunked up with nasties. Your fridge manual probably has a timeline to follow.
- Check Water Lines: Make it a habit to peek at your water lines every so often for any leaks or clogs. This keeps everything flowing the way it should.
- Schedule Deep Cleanings: Deep-clean your dispenser every half-year to keep it fresh. Check out our cleaning process guide for the nitty-gritty.
| Maintenance Task | How Often |
|---|---|
| Wipe outside bits | Weekly |
| Change water filters | Every 6 months |
| Check-out water lines | Every 3 months |
| Deep clean dispenser | Every 6 months |
Troubleshooting Common Issues
Maintenance is awesome, but stuff happens. Here’s how to fix some usual suspects:
- No Water Coming Out: First thing, make sure the water tank ain't bone-dry. If it's filled up, look for any bendy or clogged water lines.
- Water Barely Dripping: Slow flow might mean a worn-out filter. Try popping in a new one or give the lines a good clean.
- Bad Taste or Smell: Ew! If it tastes funky, change that filter or clean out the reservoir pronto. Need more details? Peek at our refrigerator filter post.
- Leaky Faucet Vibes: Got leaks? Double-check where the water line connects. Tighten those up. If it keeps up, consider calling a pro.
Stick to these pointers, and your fridge’s water dispenser will stay spiffy, always dripping with cool, tasty water when you're thirsty. For more tips, take a look at our other reads on patisserie fridge displays or fridge and freezer drawers.